Aluminum alloy has high specific strength, good corrosion resistance, high toughness and easy processing. It is widely used in various high-strength structural parts of aircraft, missiles and rockets. It is an important material in the aerospace field. A certain model of product is extruded from 7A04 aluminum alloy. After heat treatment of one furnace of […]
Aluminum alloy has high specific strength, good corrosion resistance, high toughness and easy processing.
It is widely used in various high-strength structural parts of aircraft, missiles and rockets.
It is an important material in the aerospace field.
A certain model of product is extruded from 7A04 aluminum alloy.
After heat treatment of one furnace of product, it was found that there were defects in the bottom of the bullet.
There were delamination and slag falling at the mouth of the bottom of the bullet.
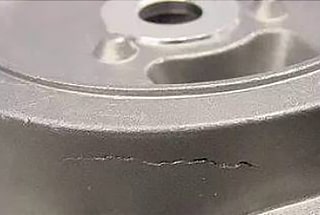
Circular cracks formed along the circumference were visible at the cone part of the outer surface, and circular cracks formed along the circumference were also found at the arc transition of the inner hole.
In order to find out the causes of the defects in the bottom of the bullet, the causes of defects in the aluminum alloy shell bottom are analyzed.
In combination with the processing process of the bullet bottom, the defects of the cartridge bottom are analyzed according to the fault tree analysis method.

Figure 1 Fault Tree of Bullet Bottom Defect
After training and assessment, the operators have taken up their posts with certificates and are all experienced operators.
The raw material is 7A04 bar, and the chemical composition, mechanical properties, metallographic structure and macrostructure of the incoming acceptance are all qualified.
The processing technology of ammunition bottom has been used for many years, and the process parameters are reasonable and effective.
Process flow: preparation before production → feeding → die forging → rough machining → heat treatment → finish machining;
The heat treatment method of aluminum alloy is T6 treatment, in which the quenching temperature of solution treatment is 470 ℃.
After checking the heat treatment equipment, the operator was informed that the workpiece color was red when the bomb bottom of the furnace came out, which had not happened before.
Combined with the fault tree for troubleshooting and analysis, the possible problems in personnel, materials and technology were eliminated, and it was basically determined that the defects in the bomb bottom were caused by the problems in the heat treatment equipment.
In order to find out the cause of the defect, the bullet bottom anatomy with obvious defects was selected for physical and chemical inspection.
Cut along the axis of the shell bottom.
According to the requirements of GB / T 3246.2-2012 structural inspection methods for deformed aluminum and aluminum alloy products Part 2: inspection methods for macrostructure, the macrostructure of the failed aluminum alloy shell bottom was analyzed.
After etching, it was found that there were a large number of cracks on the test surface and inward extending cracks at the arc transition of the inner wall.
At the same time, a coarse-grained ring with a depth of 2.5mm was found on the surface of the outer cone.
There were cracks at the interface between the coarse-grained ring and the substrate, and longitudinal cracks at the bottom center.
Take the metallographic sample at the arc transition of the bomb bottom.
According to the requirements of GB / T 3246.1-2012 inspection methods for microstructure of deformed aluminum and aluminum alloy products Part 1: inspection methods for microstructure, after grinding the sample, use mixed acid aqueous solution for corrosion.
The microstructure is shown in Fig. 2.
After observation, remelted eutectic phase appears in the microstructure of the sample, and there are a lot of structural features similar to remelted triangle, which are enriched on the grain boundary.
It has the characteristics of widening grain boundaries and is a typical overburned structure.

Fig. 2 microstructure of bullet bottom
In order to find out the cause of overburning, the temperature field in the heat treatment furnace during charging is detected according to GB / T 9452-2012 method for determination of the effective heating zone of the heat treatment furnace.
The No. 5 measuring point of the testing equipment is connected to the thermocouple, and the other 5 measuring points are placed at the workpiece.
The positions of the measuring points are shown in Fig. 3.
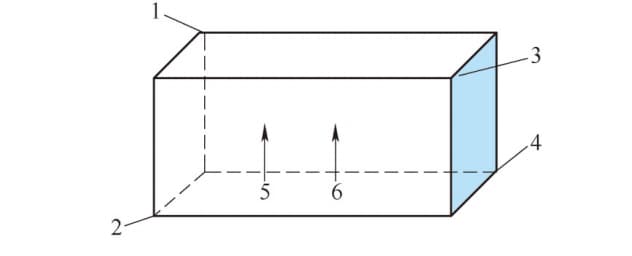
Fig. 3 furnace temperature detection position
Note: 1 ~ 6 are temperature measuring points
Place measuring points according to Fig. 3 to test the temperature field in the heat treatment furnace.
The furnace temperature is set at 470 ℃, and the temperature is kept for 70min.
Record the temperature change of each measuring point.
See Table 1 for the test results.
Table 1 temperature detection results of heat treatment furnace (℃)
| Point | Maximum | Minimum |
| 1 | 507.68 | 488.61 |
| 2 | 475.77 | 473.93 |
| 3 | 521.13 | 502.29 |
| 4 | 504.43 | 488.89 |
| 5 | 525.04 | 500.33 |
| 6 | 491.57 | 481.32 |
| Equipment temperature setting | 470 | |
Test results: the difference between the maximum temperature and the minimum temperature in the furnace exceeds 50 ℃, and the temperature fluctuates greatly.
The measured temperature in the furnace is inconsistent with the set temperature, and the temperature in the furnace is higher than the set temperature.
Immediately, the heat treatment furnace was overhauled.
It was found that the lining plate on the right side of the inner wall of the furnace was cracked and the gap was large.
The fan in the furnace was loose and the speed was too slow.
The maximum temperature of the heat treatment furnace is 525.04 ℃, which is 489 ℃ higher than the melting point of 7A04 aluminum alloy low melting point eutectic Al + T (Al2Mg3Zn3), which will cause the aluminum alloy grain boundary and the insoluble phases such as Al6 (MnFe) and AlMnFeSi in the crystal to form agglomerates, and form remelted balls with the agglomerated insoluble phases as the core at local grain boundaries, resulting in overburnt structure.
The overburned structure makes the grain boundaries of aluminum alloy brittle and reduces the strength.
In the subsequent quenching and cooling process, it is subjected to high-strength stress and produces cracks, which reduces the fatigue property and corrosion property of the workpiece.
Therefore, the aluminum alloy parts after heat treatment are not allowed to have overburning, and the coarse dendritic segregation may also form a band structure in the subsequent processing, resulting in the failure of the workpiece in the use process.
It can be seen from the analysis process that the reason for the defects of the bomb bottom is that the abnormal temperature of the heat treatment furnace causes the quenching heating temperature to be too high, which causes the material to be overburned.
The existence of intracrystalline segregation and redundant brittle phases significantly reduces the plasticity and causes the strength of the material to drop.
During water cooling, cracks are formed at the stress concentration points such as arc transition, sharp corners and coarse-grained rings, and cracks occur under the action of internal stress.
1) The reason for the defects of the bomb bottom is that the temperature in the heat treatment furnace is too high, which leads to the Overburning of materials and the early failure of products.
2) Repair the faulty equipment, weld the inner liner of the heat treatment furnace, replace the fan in the furnace, and repair the sealing parts.
3) Strengthen management, regularly check the heat treatment furnace, and use infrared thermometer to test the actual temperature in the furnace before the workpiece is put into the furnace.
