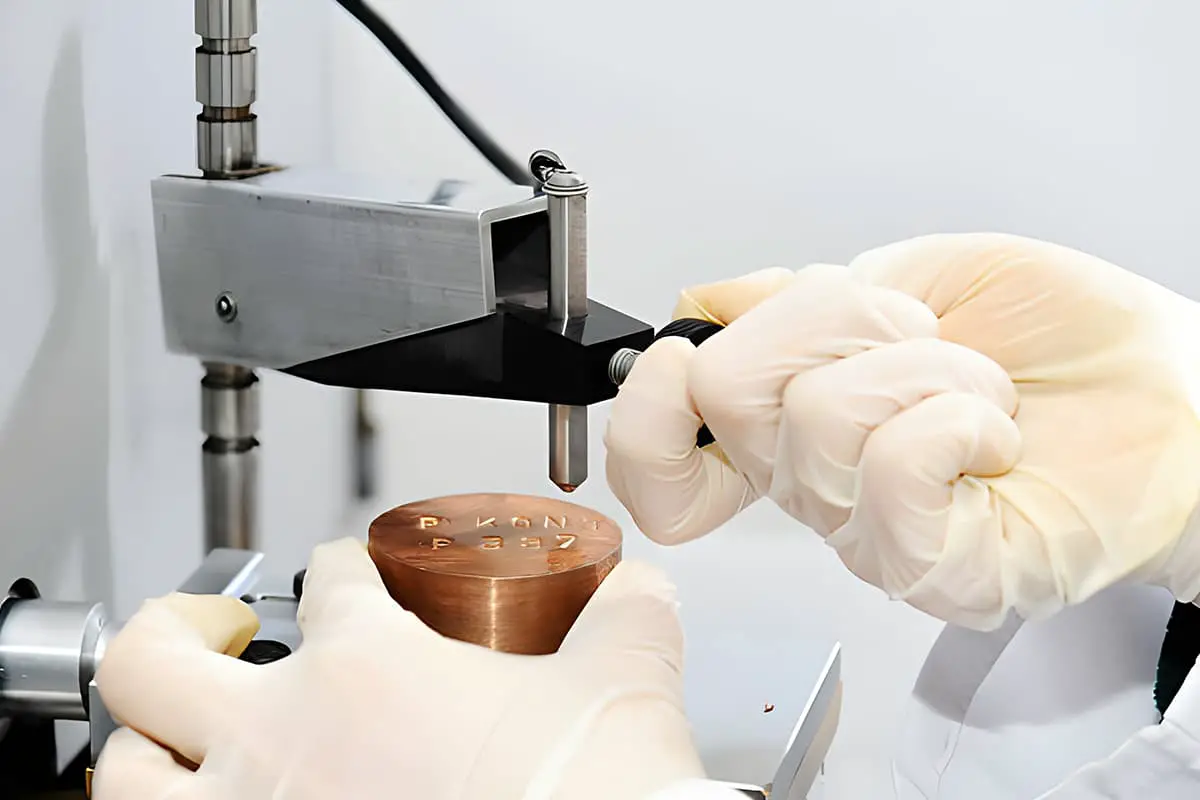
Have you ever wondered what those mysterious numbers on a metal part mean? In this blog post, we’ll dive into the fascinating world of hardness testing and explore the different scales used to measure a material’s resistance to deformation. Whether you’re an engineer, a machinist, or simply curious about the properties of metals, this article will provide you with valuable insights and practical knowledge to enhance your understanding of hardness measurement techniques.
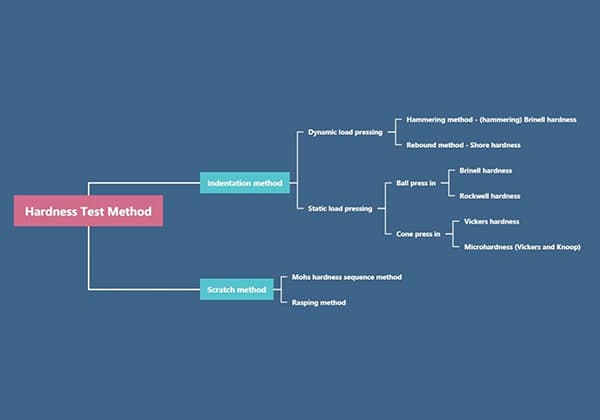
Hardness is a measure of a material’s resistance to the penetration of a hard object into its surface, serving as a crucial performance indicator for metal materials. Typically, higher hardness values correlate with better wear resistance. The most common hardness indicators are Brinell hardness, Rockwell hardness, and Vickers hardness.
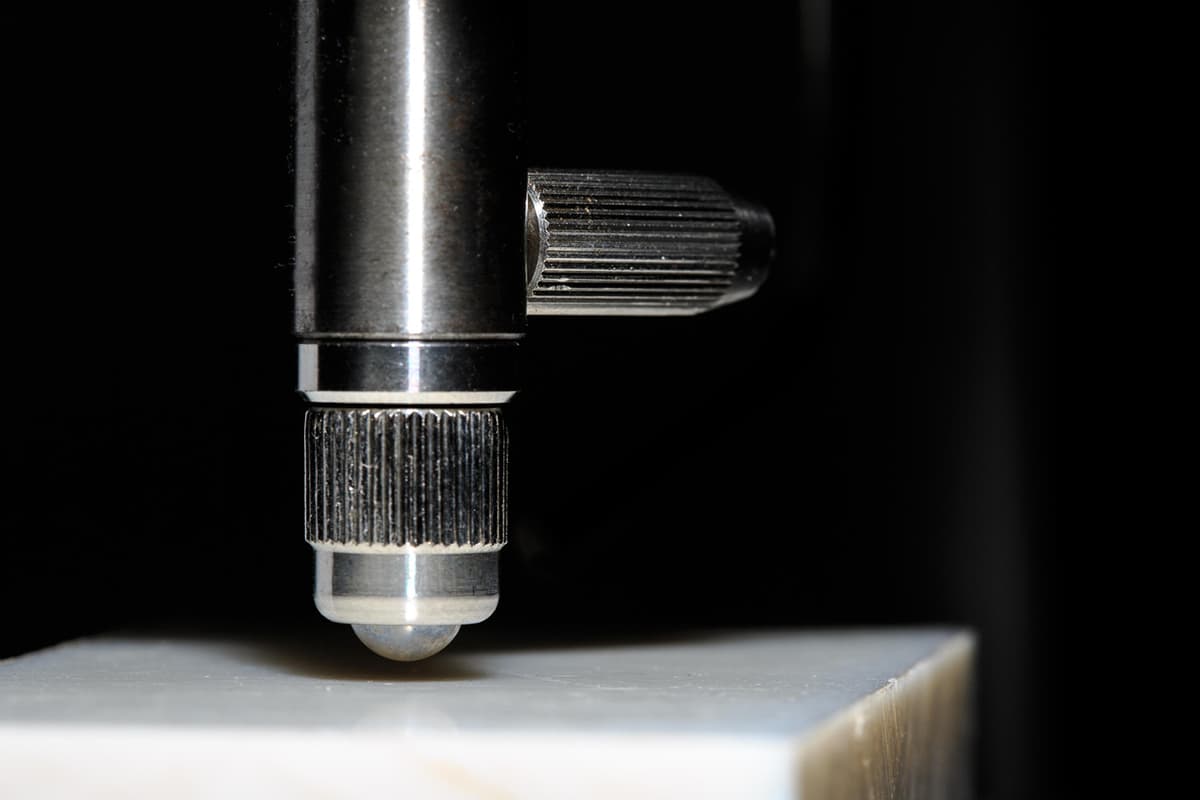
Brinell hardness is measured by applying a specific load (typically 3000kg) to a hardened steel ball (usually 10mm in diameter) pressed into the material’s surface. After maintaining the load for a set period and then unloading, the Brinell hardness value (HB) is calculated as the ratio of the load to the indentation area, expressed in KN/mm² (N/mm²).
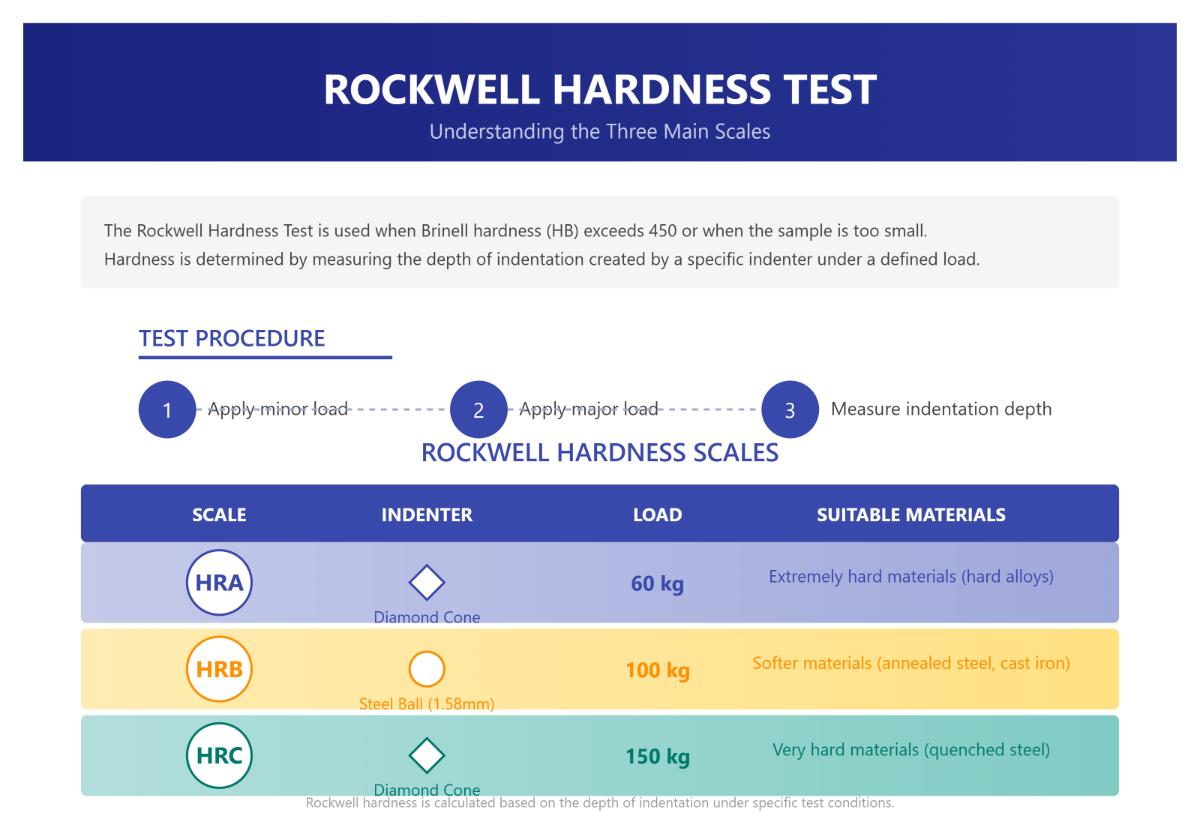
When the Brinell hardness (HB) exceeds 450 or the sample is too small, the Rockwell hardness test is used instead. This test involves pressing a diamond cone with a 120° top angle or a steel ball (1.59mm or 3.18mm in diameter) into the material’s surface under a specific load. The hardness is then calculated based on the depth of the indentation. Rockwell hardness is expressed in three scales:
Vickers hardness is determined by pressing a diamond square cone with a 136° top angle and a load of up to 120kg into the material’s surface. The Vickers hardness value (HV) is calculated by dividing the load by the surface area of the indentation pit, expressed in kgf/mm².
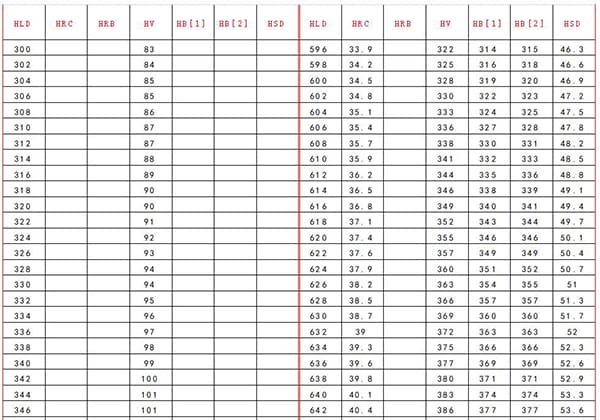
Leeb hardness measures the local or overall hardness of metallic materials by assessing the material’s response to an impact load. The Leeb hardness value can be converted into other hardness units, such as Rockwell and Brinell hardness.
Shore hardness measures the hardness of non-metallic materials by evaluating the material’s resistance to a specific indenter shape. Shore hardness values can be converted into other hardness units.
Note:
In Rockwell hardness testing, HRA, HRB, and HRC represent three different scales: Scale A, Scale B, and Scale C. The Rockwell test is a common indentation hardness test. All three scales begin with an initial pressure of 98.07N (10kgf), and the hardness value is calculated based on the depth of indentation. Scale A uses a diamond cone indenter with a maximum pressure of 588.4N (60kgf); Scale B uses a 1.588mm (1/16 inch) steel ball indenter with a maximum pressure of 980.7N (100kgf); Scale C uses the same diamond cone as Scale A but with a maximum pressure of 1471N (150kgf). Scale B is suitable for softer materials, while Scale C is for harder materials.
Experience indicates an approximate correlation between different hardness values of metal materials and between hardness and strength values. Hardness is determined by the material’s resistance to initial and subsequent plastic deformation. Therefore, higher material strength generally results in higher hardness. However, the conversion relationships between different materials are not always consistent.
Refer to the “Hardness Comparison Table” below for converting different hardness values of steel.
According to the German standard DIN50150, the following table compares the tensile strength of commonly used steel materials with Vickers hardness, Brinell hardness, and Rockwell hardness.
Tensile Strength Rm (N/mm2 ) | Vickers Hardness HV | Brinell Hardness HB | Rockwell Hardness HRC |
| 250 | 80 | 76.0 | – |
| 270 | 85 | 80.7 | – |
| 285 | 90 | 85.2 | – |
| 305 | 95 | 90.2 | – |
| 320 | 100 | 95.0 | – |
| 335 | 105 | 99.8 | – |
| 350 | 110 | 105 | – |
| 370 | 115 | 109 | – |
| 380 | 120 | 114 | – |
| 400 | 125 | 119 | – |
| 415 | 130 | 124 | – |
| 430 | 135 | 128 | – |
| 450 | 140 | 133 | – |
| 465 | 145 | 138 | – |
| 480 | 150 | 143 | – |
| 490 | 155 | 147 | – |
| 510 | 160 | 152 | – |
| 530 | 165 | 156 | – |
| 545 | 170 | 162 | – |
| 560 | 175 | 166 | – |
| 575 | 180 | 171 | – |
| 595 | 185 | 176 | – |
| 610 | 190 | 181 | – |
| 625 | 195 | 185 | – |
| 640 | 200 | 190 | – |
| 660 | 205 | 195 | – |
| 675 | 210 | 199 | – |
| 690 | 215 | 204 | – |
| 705 | 220 | 209 | – |
| 720 | 225 | 214 | – |
| 740 | 230 | 219 | – |
| 755 | 235 | 223 | – |
| 770 | 240 | 228 | 20.3 |
| 785 | 245 | 233 | 21.3 |
| 800 | 250 | 238 | 22.2 |
| 820 | 255 | 242 | 23.1 |
| 835 | 260 | 247 | 24.0 |
| 850 | 265 | 252 | 24.8 |
| 865 | 270 | 257 | 25.6 |
| 880 | 275 | 261 | 26.4 |
| 900 | 280 | 266 | 27.1 |
| 915 | 285 | 271 | 27.8 |
| 930 | 290 | 276 | 28.5 |
| 950 | 295 | 280 | 29.2 |
| 965 | 300 | 285 | 29.8 |
| 995 | 310 | 295 | 31.0 |
| 1030 | 320 | 304 | 32.2 |
| 1060 | 330 | 314 | 33.3 |
| 1095 | 340 | 323 | 34.4 |
| 1125 | 350 | 333 | 35.5 |
| 1115 | 360 | 342 | 36.6 |
| 1190 | 370 | 352 | 37.7 |
| 1220 | 380 | 361 | 38.8 |
| 1255 | 390 | 371 | 39.8 |
| 1290 | 400 | 380 | 40.8 |
| 1320 | 410 | 390 | 41.8 |
| 1350 | 420 | 399 | 42.7 |
| 1385 | 430 | 409 | 43.6 |
| 1420 | 440 | 418 | 44.5 |
| 1455 | 450 | 428 | 45.3 |
| 1485 | 460 | 437 | 46.1 |
| 1520 | 470 | 447 | 46.9 |
| 1555 | 480 | (456) | 47.7 |
| 1595 | 490 | (466) | 48.4 |
| 1630 | 500 | (475) | 49.1 |
| 1665 | 510 | (485) | 49.8 |
| 1700 | 520 | (494) | 50.5 |
| 1740 | 530 | (504) | 51.1 |
| 1775 | 540 | (513) | 51.7 |
| 1810 | 550 | (523) | 52.3 |
| 1845 | 560 | (532) | 53.0 |
| 1880 | 570 | (542) | 53.6 |
| 1920 | 580 | (551) | 54.1 |
| 1955 | 590 | (561) | 54.7 |
| 1995 | 600 | (570) | 55.2 |
| 2030 | 610 | (580) | 55.7 |
| 2070 | 620 | (589) | 56.3 |
| 2105 | 630 | (599) | 56.8 |
| 2145 | 640 | (608) | 57.3 |
| 2180 | 650 | (618) | 57.8 |
| 660 | 58.3 | ||
| 670 | 58.8 | ||
| 680 | 59.2 | ||
| 690 | 59.7 | ||
| 700 | 60.1 | ||
| 720 | 61.0 | ||
| 740 | 61.8 | ||
| 760 | 62.5 | ||
| 780 | 63.3 | ||
| 800 | 64.0 | ||
| 820 | 64.7 | ||
| 840 | 65.3 | ||
| 860 | 65.9 | ||
| 880 | 66.4 | ||
| 900 | 67.0 | ||
| 920 | 67.5 | ||
| 940 | 68.0 |
| HV | HRC | HBS |
| 940 | 68 | |
| 920 | 67.5 | |
| 900 | 67 | |
| 880 | 66.4 | |
| 860 | 65.9 | |
| 840 | 65.3 | |
| 820 | 64.7 | |
| 800 | 64 | |
| 780 | 63.3 | |
| 760 | 62.5 | |
| 740 | 61.8 | |
| 720 | 61 | |
| 700 | 60.1 | |
| 690 | 59.7 | |
| 680 | 59.2 | |
| 670 | 58.8 | |
| 660 | 58.3 | |
| 650 | 57.8 | |
| 640 | 57.3 | |
| 630 | 56.8 | |
| 620 | 56.3 | |
| 610 | 55.7 | |
| 600 | 55.2 | |
| 590 | 54.7 | |
| 580 | 54.1 | |
| 570 | 53.6 | |
| 560 | 53 | |
| 550 | 52.3 | 505 |
| 540 | 51.7 | 496 |
| 530 | 51.1 | 488 |
| 520 | 50.5 | 480 |
| 510 | 49.8 | 473 |
| 500 | 49.1 | 465 |
| 490 | 48.4 | 456 |
| 480 | 47.7 | 448 |
| 470 | 46.9 | 441 |
| 460 | 46.1 | 433 |
| 450 | 45.3 | 425 |
| 440 | 44.5 | 415 |
| 430 | 43.6 | 405 |
| 420 | 42.7 | 397 |
| 410 | 41.8 | 388 |
| 400 | 40.8 | 379 |
| 390 | 39.8 | 369 |
| 380 | 38.8 | 360 |
| 370 | 37.7 | 350 |
| 360 | 36.6 | 341 |
| 350 | 35.5 | 331 |
| 340 | 34.4 | 322 |
| 330 | 33.3 | 313 |
| 320 | 32.2 | 303 |
| 310 | 31 | 294 |
| 300 | 29.8 | 284 |
| 295 | 29.2 | 280 |
| 290 | 28.5 | 275 |
| 285 | 27.8 | 270 |
| 280 | 27.1 | 265 |
| 275 | 26.4 | 261 |
| 270 | 25.6 | 256 |
| 265 | 24.8 | 252 |
| 260 | 24 | 247 |
| 255 | 23.1 | 243 |
| 250 | 22.2 | 238 |
| 245 | 21.3 | 233 |
| 240 | 20.3 | 228 |
| 230 | 18 | |
| 220 | 15.7 | |
| 210 | 13.4 | |
| 200 | 11 | |
| 190 | 8.5 | |
| 180 | 6 | |
| 170 | 3 | |
| 160 | 0 |
| Leeb HLD | Rockwell HRC | Rockwell HRB | Vickers HV | Brinell HB[1] | Brinell HB[2] | Shore HSD |
| 300 | 83 | |||||
| 302 | 84 | |||||
| 304 | 85 | |||||
| 306 | 85 | |||||
| 308 | 86 | |||||
| 310 | 87 | |||||
| 312 | 87 | |||||
| 314 | 88 | |||||
| 316 | 89 | |||||
| 318 | 90 | |||||
| 320 | 90 | |||||
| 322 | 91 | |||||
| 324 | 92 | |||||
| 326 | 93 | |||||
| 328 | 94 | |||||
| 330 | 94 | |||||
| 332 | 95 | |||||
| 334 | 96 | |||||
| 336 | 97 | |||||
| 338 | 98 | |||||
| 340 | 99 | |||||
| 342 | 100 | |||||
| 344 | 101 | |||||
| 346 | 101 | |||||
| 348 | 102 | |||||
| 350 | 59.6 | 103 | ||||
| 352 | 60.3 | 104 | ||||
| 354 | 61 | 105 | ||||
| 356 | 61.7 | 106 | ||||
| 358 | 62.4 | 107 | ||||
| 360 | 63.1 | 108 | ||||
| 362 | 63.8 | 109 | ||||
| 364 | 64.5 | 110 | ||||
| 366 | 65.1 | 111 | ||||
| 368 | 65.8 | 112 | ||||
| 370 | 66.4 | 114 | ||||
| 372 | 67 | 115 | ||||
| 374 | 67.7 | 116 | ||||
| 376 | 68.3 | 117 | ||||
| 378 | 68.9 | 118 | ||||
| 380 | 69.5 | 119 | ||||
| 382 | 70.1 | 120 | ||||
| 384 | 70.6 | 121 | ||||
| 386 | 71.2 | 123 | ||||
| 388 | 71.8 | 124 | ||||
| 390 | 72.3 | 125 | ||||
| 392 | 72.9 | 126 | ||||
| 394 | 73.4 | 127 | ||||
| 396 | 74 | 129 | ||||
| 398 | 74.5 | 130 | ||||
| 400 | 75 | 131 | 142 | |||
| 402 | 75.5 | 133 | 144 | |||
| 404 | 76 | 134 | 145 | |||
| 406 | 76.5 | 135 | 147 | |||
| 408 | 77 | 136 | 149 | |||
| 410 | 77.5 | 138 | 150 | |||
| 412 | 78 | 139 | 152 | |||
| 414 | 78.4 | 141 | 153 | |||
| 416 | 78.9 | 142 | 155 | |||
| 418 | 79.3 | 143 | 156 | |||
| 420 | 79.8 | 145 | 140 | 157 | ||
| 422 | 80.2 | 146 | 141 | 159 | ||
| 424 | 80.7 | 148 | 143 | 160 | ||
| 426 | 81.1 | 149 | 144 | 162 | ||
| 428 | 81.5 | 151 | 145 | 163 | ||
| 430 | 81.9 | 152 | 147 | 165 | ||
| 432 | 82.4 | 154 | 148 | 166 | ||
| 434 | 82.8 | 155 | 150 | 168 | ||
| 436 | 83.2 | 157 | 151 | 169 | ||
| 438 | 83.6 | 158 | 153 | 171 | ||
| 440 | 84 | 160 | 154 | 172 | ||
| 442 | 84.4 | 161 | 156 | 174 | ||
| 444 | 84.8 | 163 | 157 | 175 | ||
| 446 | 85.1 | 164 | 159 | 176 | ||
| 448 | 85.5 | 166 | 160 | 178 | ||
| 450 | 85.9 | 168 | 162 | 179 | ||
| 452 | 86.3 | 169 | 164 | 181 | ||
| 454 | 86.6 | 171 | 165 | 182 | ||
| 456 | 87 | 173 | 167 | 184 | ||
| 458 | 87.4 | 174 | 168 | 185 | ||
| 460 | 87.7 | 176 | 170 | 187 | 26.4 | |
| 462 | 88.1 | 178 | 172 | 188 | 26.7 | |
| 464 | 88.5 | 179 | 173 | 190 | 27 | |
| 466 | 88.8 | 181 | 175 | 191 | 27.3 | |
| 468 | 89.2 | 183 | 177 | 193 | 27.6 | |
| 470 | 89.5 | 185 | 178 | 194 | 27.9 | |
| 472 | 89.9 | 186 | 180 | 196 | 28.2 | |
| 474 | 90.3 | 188 | 182 | 197 | 28.5 | |
| 476 | 90.6 | 190 | 184 | 198 | 28.8 | |
| 478 | 91 | 192 | 185 | 200 | 29.1 | |
| 480 | 91.3 | 194 | 187 | 202 | 29.4 | |
| 482 | 91.7 | 195 | 189 | 203 | 29.7 | |
| 484 | 92.1 | 197 | 191 | 205 | 30 | |
| 486 | 92.4 | 199 | 192 | 206 | 30.3 | |
| 488 | 92.8 | 201 | 194 | 208 | 30.6 | |
| 490 | 93.1 | 203 | 196 | 209 | 30.9 | |
| 492 | 93.5 | 205 | 198 | 211 | 31.2 | |
| 494 | 93.9 | 207 | 200 | 212 | 31.5 | |
| 496 | 94.3 | 209 | 202 | 214 | 31.7 | |
| 498 | 94.6 | 211 | 204 | 215 | 32 | |
| 500 | 95 | 213 | 205 | 217 | 32.2 | |
| 502 | 95.4 | 215 | 207 | 219 | 32.5 | |
| 504 | 95.8 | 217 | 209 | 220 | 32.8 | |
| 506 | 96.2 | 219 | 211 | 222 | 33.1 | |
| 508 | 96.6 | 221 | 213 | 224 | 33.3 | |
| 510 | 19.8 | 97 | 223 | 215 | 225 | 33.6 |
| 512 | 20.2 | 97.4 | 225 | 217 | 227 | 33.9 |
| 514 | 20.6 | 97.9 | 227 | 219 | 229 | 34.2 |
| 516 | 21 | 98.3 | 229 | 221 | 230 | 34.4 |
| 518 | 21.3 | 98.7 | 231 | 223 | 232 | 34.7 |
| 520 | 21.7 | 99.2 | 233 | 225 | 234 | 35 |
| 522 | 22 | 99.6 | 235 | 227 | 235 | 35.3 |
| 524 | 22.4 | 237 | 229 | 237 | 35.6 | |
| 526 | 22.8 | 239 | 231 | 239 | 35.8 | |
| 528 | 23.1 | 241 | 234 | 241 | 36.1 | |
| 530 | 23.5 | 244 | 236 | 242 | 36.4 | |
| 532 | 23.8 | 246 | 238 | 244 | 36.7 | |
| 534 | 24.1 | 248 | 240 | 246 | 37 | |
| 536 | 24.5 | 250 | 242 | 248 | 37.3 | |
| 538 | 24.8 | 252 | 244 | 250 | 37.6 | |
| 540 | 25.2 | 255 | 246 | 252 | 37.9 | |
| 542 | 25.5 | 257 | 249 | 254 | 38.1 | |
| 544 | 25.8 | 259 | 251 | 256 | 38.4 | |
| 546 | 26.2 | 261 | 253 | 258 | 38.7 | |
| 548 | 26.5 | 264 | 255 | 259 | 39 | |
| 550 | 26.8 | 266 | 258 | 261 | 39.3 | |
| 552 | 27.1 | 268 | 262 | 263 | 39.6 | |
| 554 | 27.5 | 270 | 262 | 265 | 39.9 | |
| 556 | 27.8 | 273 | 265 | 268 | 40.2 | |
| 558 | 28.1 | 275 | 267 | 270 | 40.5 | |
| 560 | 28.4 | 278 | 269 | 272 | 40.8 | |
| 562 | 28.8 | 280 | 272 | 274 | 41.1 | |
| 564 | 29.1 | 282 | 274 | 276 | 41.4 | |
| 566 | 29.4 | 285 | 276 | 278 | 41.7 | |
| 568 | 29.7 | 287 | 279 | 280 | 42 | |
| 570 | 30 | 290 | 281 | 282 | 42.3 | |
| 572 | 30.3 | 292 | 283 | 285 | 42.6 | |
| 574 | 30.6 | 294 | 286 | 287 | 42.9 | |
| 576 | 30.9 | 297 | 288 | 289 | 43.2 | |
| 578 | 31.2 | 299 | 291 | 292 | 43.5 | |
| 580 | 31.5 | 302 | 293 | 294 | 43.8 | |
| 582 | 31.8 | 304 | 296 | 296 | 44.1 | |
| 584 | 32.1 | 307 | 298 | 299 | 44.4 | |
| 586 | 32.4 | 309 | 301 | 301 | 44.7 | |
| 588 | 32.7 | 312 | 303 | 304 | 45 | |
| 590 | 33 | 315 | 306 | 308 | 45.4 | |
| 592 | 33.3 | 317 | 308 | 310 | 45.7 | |
| 594 | 33.6 | 320 | 311 | 313 | 46 | |
| 596 | 33.9 | 322 | 314 | 315 | 46.3 | |
| 598 | 34.2 | 325 | 316 | 318 | 46.6 | |
| 600 | 34.5 | 328 | 319 | 320 | 46.9 | |
| 602 | 34.8 | 330 | 322 | 323 | 47.2 | |
| 604 | 35.1 | 333 | 324 | 325 | 47.5 | |
| 606 | 35.4 | 336 | 327 | 328 | 47.8 | |
| 608 | 35.7 | 338 | 330 | 331 | 48.2 | |
| 610 | 35.9 | 341 | 332 | 333 | 48.5 | |
| 612 | 36.2 | 344 | 335 | 336 | 48.8 | |
| 614 | 36.5 | 346 | 338 | 339 | 49.1 | |
| 616 | 36.8 | 349 | 340 | 341 | 49.4 | |
| 618 | 37.1 | 352 | 343 | 344 | 49.7 | |
| 620 | 37.4 | 355 | 346 | 346 | 50.1 | |
| 622 | 37.6 | 357 | 349 | 349 | 50.4 | |
| 624 | 37.9 | 360 | 351 | 352 | 50.7 | |
| 626 | 38.2 | 363 | 354 | 355 | 51 | |
| 628 | 38.5 | 366 | 357 | 357 | 51.3 | |
| 630 | 38.7 | 369 | 360 | 360 | 51.7 | |
| 632 | 39 | 372 | 363 | 363 | 52 | |
| 634 | 39.3 | 375 | 366 | 366 | 52.3 | |
| 636 | 39.6 | 377 | 369 | 369 | 52.6 | |
| 638 | 39.8 | 380 | 371 | 371 | 52.9 | |
| 640 | 40.1 | 383 | 374 | 374 | 53.3 | |
| 642 | 40.4 | 386 | 377 | 377 | 53.6 | |
| 644 | 40.7 | 389 | 380 | 380 | 53.9 | |
| 646 | 40.9 | 392 | 383 | 383 | 54.2 | |
| 648 | 41.2 | 395 | 386 | 386 | 54.6 | |
| 650 | 41.5 | 398 | 389 | 389 | 54.9 | |
| 652 | 41.7 | 401 | 392 | 392 | 55.2 | |
| 654 | 42 | 404 | 395 | 395 | 55.6 | |
| 656 | 42.3 | 407 | 398 | 398 | 55.8 | |
| 658 | 42.6 | 411 | 401 | 401 | 56.2 | |
| 660 | 42.8 | 414 | 404 | 404 | 56.5 | |
| 662 | 43.1 | 417 | 407 | 407 | 56.9 | |
| 664 | 43.4 | 420 | 410 | 410 | 57.2 | |
| 666 | 43.6 | 423 | 413 | 413 | 57.5 | |
| 668 | 43.9 | 426 | 417 | 417 | 57.9 | |
| 670 | 44.1 | 429 | 420 | 420 | 58.2 | |
| 672 | 44.4 | 433 | 423 | 423 | 58.5 | |
| 674 | 44.7 | 436 | 426 | 426 | 58.9 | |
| 676 | 44.9 | 439 | 429 | 429 | 59.2 | |
| 678 | 45.2 | 442 | 432 | 432 | 59.5 | |
| 680 | 45.5 | 446 | 435 | 435 | 59.9 | |
| 682 | 45.7 | 449 | 439 | 439 | 60.2 | |
| 684 | 46 | 452 | 442 | 442 | 60.5 | |
| 686 | 46.2 | 456 | 445 | 445 | 60.9 | |
| 688 | 46.5 | 459 | 448 | 448 | 61.2 | |
| 690 | 46.8 | 463 | 451 | 451 | 61.6 | |
| 692 | 47 | 466 | 455 | 455 | 61.9 | |
| 694 | 47.3 | 469 | 458 | 458 | 62.2 | |
| 696 | 47.5 | 473 | 461 | 461 | 62.6 | |
| 698 | 47.8 | 476 | 465 | 465 | 62.9 | |
| 700 | 48 | 480 | 468 | 468 | 63.3 | |
| 702 | 48.3 | 483 | 471 | 471 | 63.6 | |
| 704 | 48.6 | 487 | 474 | 474 | 64 | |
| 706 | 48.8 | 491 | 478 | 478 | 64.3 | |
| 708 | 49.1 | 494 | 481 | 481 | 64.6 | |
| 710 | 49.3 | 498 | 485 | 485 | 65 | |
| 712 | 49.6 | 501 | 488 | 488 | 65.3 | |
| 714 | 49.8 | 505 | 491 | 491 | 65.7 | |
| 716 | 50.1 | 509 | 495 | 495 | 66 | |
| 718 | 50.3 | 513 | 498 | 498 | 66.4 | |
| 720 | 50.6 | 516 | 502 | 502 | 66.7 | |
| 722 | 50.8 | 520 | 505 | 505 | 67.1 | |
| 724 | 51.1 | 524 | 508 | 508 | 67.4 | |
| 726 | 51.3 | 528 | 512 | 512 | 67.8 | |
| 728 | 51.6 | 532 | 515 | 515 | 68.2 | |
| 730 | 51.8 | 535 | 519 | 519 | 68.5 | |
| 732 | 52.1 | 539 | 522 | 522 | 68.9 | |
| 734 | 52.3 | 543 | 526 | 526 | 69.2 | |
| 736 | 52.6 | 547 | 529 | 529 | 69.6 | |
| 738 | 52.8 | 551 | 533 | 533 | 69.9 | |
| 740 | 53.1 | 555 | 536 | 536 | 70.3 | |
| 742 | 53.3 | 559 | 540 | 540 | 70.7 | |
| 744 | 53.6 | 563 | 543 | 543 | 71 | |
| 746 | 53.8 | 568 | 547 | 547 | 71.4 | |
| 748 | 54.1 | 572 | 551 | 551 | 71.8 | |
| 750 | 54.3 | 576 | 554 | 554 | 72.1 | |
| 752 | 54.5 | 580 | 558 | 558 | 72.5 | |
| 754 | 54.8 | 584 | 561 | 561 | 72.9 | |
| 756 | 55 | 589 | 565 | 565 | 73.2 | |
| 758 | 55.3 | 593 | 569 | 569 | 73.6 | |
| 760 | 55.5 | 597 | 572 | 572 | 74 | |
| 762 | 55.7 | 602 | 576 | 576 | 74.3 | |
| 764 | 56 | 606 | 580 | 580 | 74.7 | |
| 766 | 56.2 | 610 | 583 | 583 | 75.1 | |
| 768 | 56.5 | 615 | 587 | 587 | 75.5 | |
| 770 | 56.7 | 619 | 591 | 591 | 75.8 | |
| 772 | 56.9 | 624 | 594 | 594 | 76.2 | |
| 774 | 57.2 | 628 | 598 | 598 | 76.6 | |
| 776 | 57.4 | 633 | 602 | 602 | 77 | |
| 778 | 57.6 | 638 | 605 | 605 | 77.4 | |
| 780 | 57.9 | 642 | 609 | 609 | 77.7 | |
| 782 | 58.1 | 647 | 613 | 613 | 78.1 | |
| 784 | 58.3 | 652 | 617 | 617 | 78.5 | |
| 786 | 58.6 | 657 | 620 | 620 | 78.9 | |
| 788 | 58.8 | 662 | 624 | 624 | 79.3 | |
| 790 | 59 | 666 | 628 | 628 | 79.7 | |
| 792 | 59.2 | 671 | 632 | 632 | 80.1 | |
| 794 | 59.5 | 676 | 635 | 635 | 80.5 | |
| 796 | 59.7 | 681 | 639 | 639 | 80.9 | |
| 798 | 59.9 | 686 | 643 | 643 | 81.2 | |
| 800 | 60.1 | 691 | 647 | 647 | 81.6 | |
| 802 | 60.4 | 697 | 651 | 651 | 82 | |
| 804 | 60.6 | 702 | 82.4 | |||
| 806 | 60.8 | 707 | 82.8 | |||
| 808 | 61 | 712 | 83.2 | |||
| 810 | 61.2 | 718 | 83.7 | |||
| 812 | 61.4 | 723 | 84.1 | |||
| 814 | 61.7 | 728 | 84.5 | |||
| 816 | 61.9 | 734 | 84.9 | |||
| 818 | 62.1 | 739 | 85.3 | |||
| 820 | 62.3 | 745 | 85.7 | |||
| 822 | 62.5 | 750 | 86.1 | |||
| 824 | 62.7 | 756 | 86.5 | |||
| 826 | 62.9 | 762 | 87 | |||
| 828 | 63.1 | 768 | 87.4 | |||
| 830 | 63.3 | 773 | 87.8 | |||
| 832 | 63.5 | 779 | 88.2 | |||
| 834 | 63.7 | 785 | 88.6 | |||
| 836 | 63.9 | 791 | 89.1 | |||
| 838 | 64.1 | 797 | 89.5 | |||
| 840 | 64.3 | 803 | 89.9 | |||
| 842 | 64.5 | 809 | 90.4 | |||
| 844 | 64.7 | 816 | 90.8 | |||
| 846 | 64.9 | 822 | 91.2 | |||
| 848 | 65.1 | 828 | 91.7 | |||
| 850 | 65.3 | 835 | 92.1 | |||
| 852 | 65.4 | 841 | 92.6 | |||
| 854 | 65.6 | 848 | 93 | |||
| 856 | 65.8 | 854 | 93.5 | |||
| 858 | 66 | 861 | 93.9 | |||
| 860 | 66.2 | 867 | 94.4 | |||
| 862 | 66.3 | 874 | 94.8 | |||
| 864 | 66.5 | 881 | 95.3 | |||
| 866 | 66.7 | 888 | 95.7 | |||
| 868 | 66.8 | 895 | 96.2 | |||
| 870 | 67 | 902 | 96.7 | |||
| 872 | 67.2 | 909 | 97.1 | |||
| 874 | 67.3 | 916 | 97.6 | |||
| 876 | 67.5 | 923 | 98.1 | |||
| 878 | 67.6 | 931 | 98.6 | |||
| 880 | 67.8 | 938 | 99 | |||
| 882 | 68 | 946 | 99.5 | |||
| 884 | 68.1 | 953 | ||||
| 886 | 68.2 | 961 | ||||
| 888 | 68.4 | 968 | ||||
| 890 | 68.5 | 976 |
Approximate conversion values of steel Vickers hardness (HV) to other hardness and strength measures.
| Vickers Hardness | Brinell Hardness | Rockwell Hardness | Surface Rockwell Hardness | Shore Hardness | Tensile Strength (Approximate Value) | Vickers Hardness | ||||||
| 10-mm Steel Ball 3000-kg Load | Surface Diamond Cone Indenter | |||||||||||
| Standard Steel Ball | Tungsten Carbide Steel Ball | A. Scale | ·Scale | ·Scale | ·Scale | 15-N | 30-N | 45-N | Mpa(1000psi) | |||
| 60-kg Load | 100-kg Load | 100-kg Load | 100-kg Load | Scale | Scale | Scale | ||||||
| Diamond Cone Indenter | Diamond Cone Indenter | Diamond Cone Indenter | Diamond Cone Indenter | 15-kg Load | 30-kg Load | 45-kg Load | ||||||
| HV | HBS | HBW | HRA | HRB | HRC | HRD | HR15N | HR30N | HR45N | HS | σb | HV |
| 1 | 2 | 3 | 4 | 5 | 6 | 7 | 8 | 9 | 10 | 11 | 12 | 13 |
| 370 | 350 | 350 | 69.2 | - | 37.7 | 53.6 | 79.2 | 57.4 | 40.4 | - | 1170(170) | 370 |
| 360 | 341 | 341 | 68.7 | -109 | 36.6 | 52.8 | 78.6 | 56.4 | 39.1 | 50 | 1130(164) | 360 |
| 350 | 331 | 331 | 68.1 | - | 35.5 | 51.9 | 78 | 55.4 | 37.8 | - | 1095(159) | 350 |
| 340 | 322 | 322 | 67.6 | -108 | 34.4 | 51.1 | 77.4 | 54.4 | 36.5 | 47 | 1070(155) | 340 |
| 330 | 313 | 313 | 67 | - | 33.3 | 50.2 | 76.8 | 53.6 | 35.2 | - | 1035(150) | 330 |
| 320 | 303 | 303 | 66.4 | -107 | 32.3 | 49.4 | 76.2 | 52.3 | 33.9 | 45 | 1005(146) | 320 |
| 310 | 294 | 294 | 65.8 | - | 31 | 48.4 | 75.6 | 51.3 | 32.5 | - | 980(142) | 310 |
| 300 | 284 | 284 | 65.2 | -105.5 | 29.8 | 47.5 | 74.9 | 50.2 | 31.1 | 42 | 950(138) | 300 |
| 295 | 280 | 280 | 65.8 | - | 29.2 | 47.1 | 74.6 | 49.7 | 30.4 | - | 935(136) | 295 |
| 290 | 275 | 275 | 64.5 | -104.5 | 28.5 | 46.5 | 74.2 | 49 | 29.5 | 41 | 915(133) | 290 |
| 285 | 270 | 270 | 64.2 | - | 27.8 | 46 | 73.8 | 48.4 | 28.7 | - | 905(131) | 285 |
| 280 | 265 | 265 | 63.8 | -103.5 | 27.1 | 45.3 | 73.4 | 47.8 | 27.9 | 40 | 890(129) | 280 |
| 275 | 261 | 261 | 63.5 | - | 26.4 | 44.9 | 73 | 47.2 | 27.1 | - | 875(127) | 275 |
| 270 | 256 | 256 | 63.1 | -102 | 25.6 | 44.3 | 72.6 | 46.4 | 26.2 | 38 | 855(124) | 270 |
| 265 | 252 | 252 | 62.7 | - | 24.8 | 43.7 | 72.1 | 45.7 | 25.2 | - | 840(122) | 265 |
| 260 | 247 | 247 | 62.4 | -101 | 24 | 43.1 | 71.6 | 45 | 24.3 | 37 | 825(120) | 260 |
| 255 | 243 | 243 | 62 | - | 23.1 | 42.2 | 71.1 | 44.2 | 23.2 | -36 | 805(117) | 255 |
| 250 | 238 | 238 | 61.6 | 99.5 | 22.2 | 41.7 | 70.6 | 43.4 | 22.2 | - | 795(115) | 250 |
| 245 | 233 | 233 | 61.2 | - | 21.3 | 41.1 | 70.1 | 42.5 | 21.1 | 34 | 780(113) | 245 |
| 240 | 228 | 228 | 60.7 | 98.1 | 20.3 | 40.3 | 69.6 | 41.7 | 19.9 | 33 | 765(111) | 240 |
| 230 | 219 | 219 | - | 96.7 | -18 | - | - | - | - | 32 | 730(106) | 230 |
| 220 | 209 | 209 | - | 95 | -15.7 | - | - | - | - | 30 | 695(101) | 220 |
| 210 | 200 | 200 | - | 93.4 | -13.4 | - | - | - | - | 29 | 670(97) | 210 |
| 200 | 190 | 190 | - | 91.5 | -11 | - | - | - | - | 28 | 635(92) | 200 |
| 190 | 181 | 181 | - | 89.5 | -8.5 | - | - | - | - | 26 | 605(88) | 190 |
| 180 | 171 | 171 | - | 87.1 | -6 | - | - | - | - | 25 | 580(84) | 180 |
| 170 | 162 | 162 | - | 85 | -3 | - | - | - | - | 24 | 545(79) | 170 |
| 160 | 152 | 152 | - | 81.7 | 0 | - | - | - | - | 22 | 515(75) | 160 |
| 150 | 143 | 143 | - | 78.7 | - | - | - | - | - | 21 | 490(71) | 150 |
| 140 | 133 | 133 | ― | 75 | - | - | - | - | - | 20 | 455(66) | 140 |
| 130 | 124 | 124 | ― | 71.2 | - | - | - | - | - | - | 425(62) | 130 |
| 120 | 114 | 114 | - | 66.7 | - | - | - | - | - | - | 390(57) | 120 |
| 110 | 105 | 105 | - | 62.3 | - | - | - | - | - | - | - | 110 |
| 100 | 95 | 95 | - | 56.2 | - | - | - | - | - | - | - | 100 |
| 95 | 90 | 90 | - | 52 | - | - | - | - | - | - | - | 95 |
| 90 | 86 | 86 | - | 48 | - | - | - | - | - | - | - | 90 |
| 85 | 81 | 81 | - | 41 | - | - | - | - | - | - | 85 | |
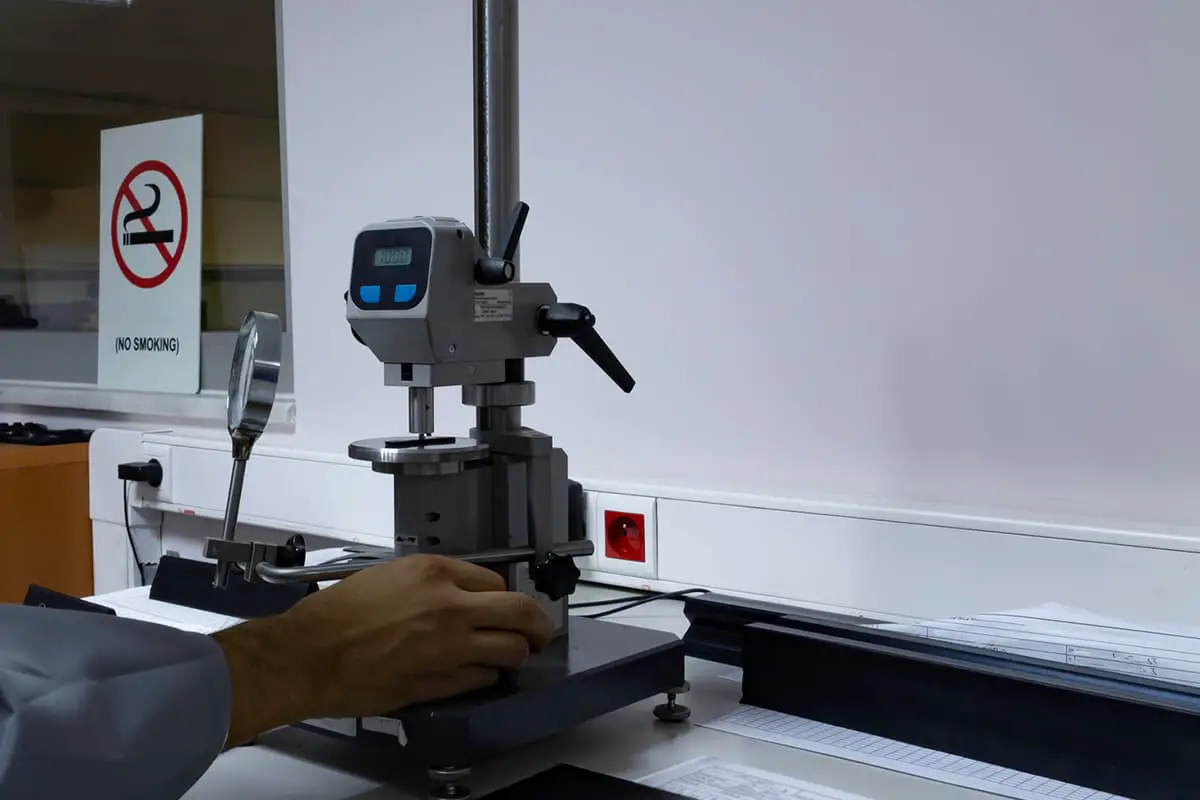
Hardness is a performance indicator that measures the degree of softness or hardness of a material. There are many methods for hardness testing, each with different principles, leading to different hardness values and meanings.
The most common is the static load indentation hardness test, such as Brinell Hardness (HB), Rockwell Hardness (HRA, HRB, HRC), and Vickers Hardness (HV).
These hardness values indicate the ability of a material surface to resist the indentation of a hard object.
The popular Leeb Hardness (HL) and Shore Hardness (HS) belong to rebound hardness tests, representing the size of the elastic deformation work of metal.
Therefore, hardness is not a simple physical quantity, but a comprehensive performance indicator reflecting the elasticity, plasticity, strength, and toughness of a material.
1. Steel Hardness: The symbol for metal hardness (Hardness) is H.
Depending on the testing method used,
Rockwell Hardness (HRC) is generally used for materials with high hardness, such as those after heat treatment.
2. HB – Brinell Hardness
This is generally used when the material is softer, such as non-ferrous metals, or steel before heat treatment or after annealing. Brinell Hardness (HB) is measured by applying a certain test load to press a hardened steel ball or carbide ball of a certain diameter into the surface of the metal being tested, maintaining it for a specified time, then unloading, and measuring the diameter of the indentation on the tested surface.
The Brinell Hardness value is obtained by dividing the load by the spherical surface area of the indentation.
Typically, a certain load (generally 3000kg) is used to press a hardened steel ball of a certain size (generally 10mm in diameter) into the material surface, maintained for a period of time, and after unloading, the ratio of the load to the indentation area is the Brinell Hardness value (HB), with units in kilogram-force/mm2 (N/mm2).
3. Rockwell hardness uses the depth of indentation plastic deformation to determine the hardness value index.
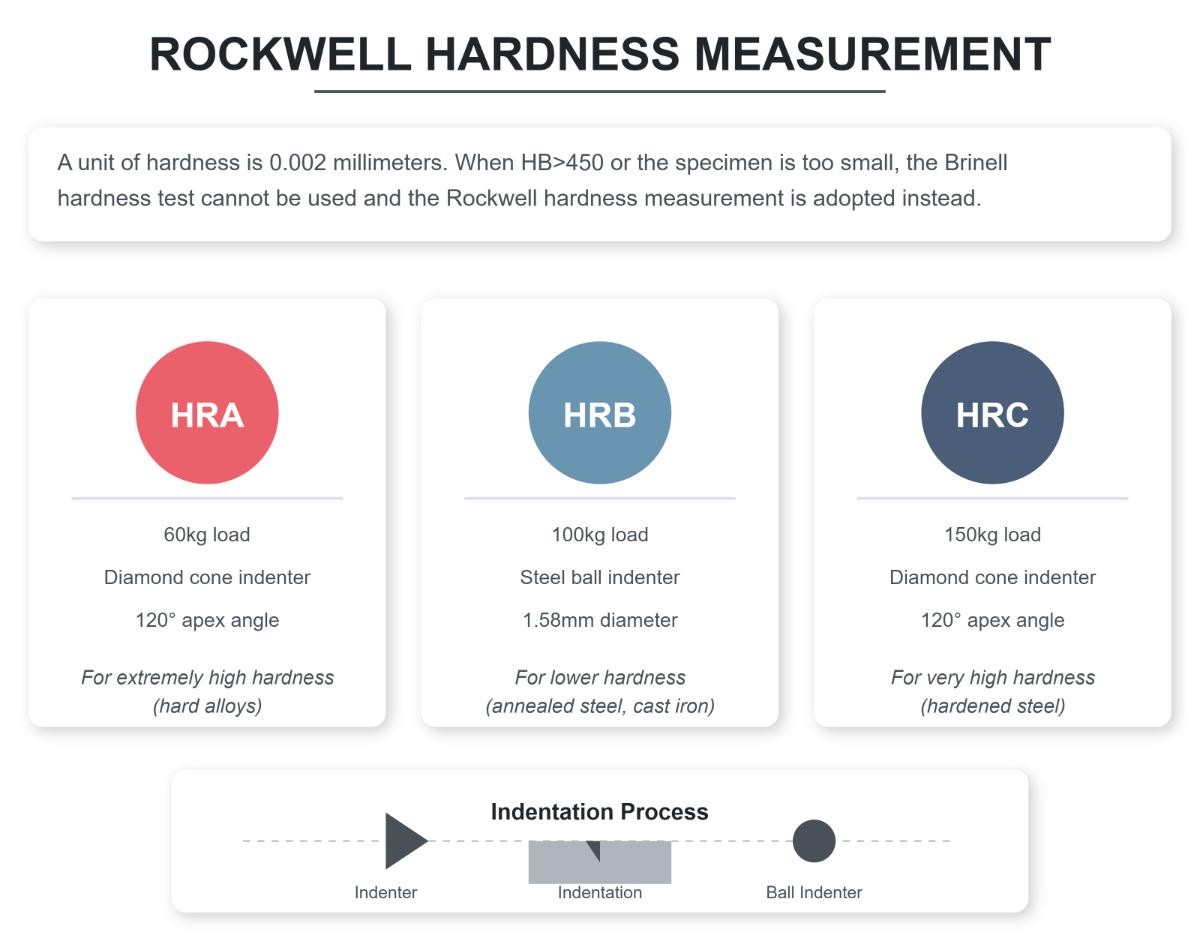
A unit of hardness is 0.002 millimeters. When HB>450 or the specimen is too small, the Brinell hardness test cannot be used and the Rockwell hardness measurement is adopted instead. This involves using a diamond cone with a 120° apex angle or a steel ball with a diameter of 1.59 or 3.18mm, under a certain load, pressed into the material surface, and determining the material’s hardness from the depth of the indentation. According to different hardness of the test material, three different scales are used:
Additionally:
If the hardness exceeds this range, use Rockwell hardness A scale (HRA).
If the hardness is below this range, use Rockwell hardness B scale (HRB).
The upper limit of Brinell hardness is HB650; it cannot exceed this value.
4. The indenter for the Rockwell hardness tester C scale is a diamond cone with a 120-degree apex angle. The test load is a fixed value, and the Chinese standard is 150 kilograms of force. The indenter for the Brinell hardness tester is a hardened steel ball (HBS) or a hard alloy ball (HBW). The test load varies with the ball diameter, ranging from 3000 to 31.25 kilograms of force.
5. The indentation of the Rockwell hardness is very small, and the measurement value is local, so the average value must be calculated by measuring several points. It is suitable for finished products and thin sheets, and is classified as non-destructive testing. The indentation of the Brinell hardness is larger, and the measurement value is accurate, but it is not suitable for finished products and thin sheets. It is generally not classified as non-destructive testing.
6. The hardness value of Rockwell hardness is a dimensionless number, with no unit. (Therefore, it is incorrect to refer to the Rockwell hardness as a degree.) The hardness value of Brinell hardness has a unit and has a certain approximate relationship with tensile strength.
7. Rockwell hardness is directly displayed on the dial and can also be displayed digitally. It is convenient to operate, quick and intuitive, and suitable for mass production. Brinell hardness requires the use of a microscope to measure the diameter of the indentation, and then look up the table or calculate, the operation is relatively cumbersome.
8. Under certain conditions, HB and HRC can be converted by looking up a table. The mental calculation formula can be roughly remembered as: 1HRC≈1/10HB.
Hardness is a critical property of materials, particularly in industrial and engineering applications. It refers to the measure of a material’s resistance to deformation, especially plastic deformation, when subjected to a force. In simpler terms, hardness indicates the ability of a material to resist penetration, scratching, or wear. This attribute is crucial when evaluating the performance and durability of materials used in various environments.
There are several hardness measurement scales and methods, but commonly used ones include HLD, HRC, HRB, HV, HB, and HSD. Each of these measurements tests different aspects of a material’s resistance to forces or deformation using specific testing techniques and machinery. It is important to understand the various hardness scales as they may provide different results and are best suited for specific types of materials.

HLD, or Leeb Hardness, is a dynamic hardness test that measures the rebound velocity of a small impact body after being struck against the material under test. The higher the rebound velocity, the harder the material. HLD is utilized for in-situ testing of large and cumbersome components.
HRC, HRB, and other Rockwell Hardness scales utilize a small indenter to create an indentation on the surface of the material under a predetermined force. The depth of indentation is measured, giving us an indication of the hardness. The hardness values are represented as 0-100 HRC, 0-100 HRB, and so on. Rockwell Hardness is typically used for assessing metals and harder materials.
HV represents Vickers Hardness and employs a diamond pyramid indenter with a load applied to create a small indentation on the material’s surface. The dimensions of the indentation are then measured, which reveals the material’s hardness value. Vickers Hardness is suitable for materials with varying hardness levels and thicknesses, including ceramics and thin metal coatings.
HB signifies Brinell Hardness and uses a spherical indenter under a specific load pushed into the material. The diameter of the indentation left is measured to determine the material’s hardness. Brinell Hardness is commonly utilized for softer materials such as aluminum, brass, and certain types of steel.
Lastly, HSD is an abbreviation for Hardness Scleroscope— a less common hardness test method that operates on the principle of measuring the rebound height of a diamond-tipped hammer after it impacts the material’s surface.
Selecting the appropriate hardness measurement method is crucial for obtaining accurate results and gauging material performance. It is essential to consider the specific material properties, industry requirements, and application needs to make informed decisions when selecting hardness measurement methods.
Common sources of errors in hardness testing mainly include errors from the hardness tester itself, changes in test conditions, and technical errors from the operator. Specifically, the sources of error in Rockwell hardness testing can be divided into three main categories: the first category is issues with the hardness tester itself, such as the test force, indenter form position error, and measurement structure error; the second category of errors stems from changes in test conditions; the third category of errors originates from technical errors of the operator. The sources of error in Vickers hardness testing include the operator’s targeting and reading of the indentation diagonals, which may be erroneous, and the result differences that may arise from different personnel using different measuring devices.
To reduce these errors, the following measures can be taken:
For errors from the hardness tester itself, they can be reduced through regular calibration and maintenance. For example, for Rockwell hardness testers, ensure that its parts do not deform or move to avoid errors caused by hardness parameters exceeding the specified standards.
Improve test conditions, such as increasing the surface roughness, weight, and coupling degree of the workpiece, especially when measuring Brinell hardness. For special materials such as thin plates, apply a uniform layer of butter or Vaseline on the backside to improve the coupling effect.
Reduce the operator’s technical errors. Fully automatic Vickers hardness testers can largely eliminate human errors as they reduce the dependency on targeting and reading of the indentation diagonals.
Use suitable hardness testers for testing. For example, for small workpieces, choose a suitable hardness tester and take corresponding measures to reduce errors, such as avoiding lateral impact on hollow materials.
Through these measures, errors in hardness testing can be effectively reduced, improving the accuracy and reliability of the test results.
