1. Pre-Operation Inspection
1.1 Add appropriate lubricating oil and grease according to the machine lubrication chart.
1.2 Check that all electrical facilities, handles, transmission parts, guards, and limit devices are complete, reliable, and flexible.
1.3 All gears should be in the neutral position, and the belt tension should meet the requirements.
1.4 Do not place metal objects directly on the bed surface to avoid damaging it.
1.5 Ensure that the workpiece being processed is free from mud and sand to prevent them from falling into the carriage and damaging the guide rails.
1.6 Before clamping the workpiece, it must undergo a trial run to ensure everything is normal before mounting the workpiece.
2. Operating Procedures
2.1 Properly secure the workpiece, start the lubricating oil pump first, and ensure that the oil pressure meets the machine’s specifications before starting.
2.2 When adjusting the gear box or hanging wheel, the power supply must be disconnected. After adjustment, all bolts must be tightened, and the wrench should be promptly removed. Perform a test run without the workpiece.
2.3 After loading or unloading the workpiece, immediately remove the chuck wrench and any floating objects on the workpiece.
2.4 Adjust the tailstock, rocker, and other parts of the machine to the appropriate positions according to processing needs, and tighten or clamp them.
2.5 The workpiece, cutting tools, and fixtures must be securely clamped, and the cutting force should extend into the workpiece before starting the machine.
2.6 When using a center frame or a follow rest, ensure that the center is properly adjusted and has good lubrication and support contact.
2.7 When machining long materials, the portion extending beyond the spindle should be kept within a reasonable range. If it is too long, a support rack should be installed, and a warning sign should be hung.
2.8 When approaching the workpiece, the tool should be slowly brought close to it to avoid impact. The speed of the carriage should be uniform during back and forth movements. When changing tools, ensure that there is an appropriate distance between the tool and the workpiece.
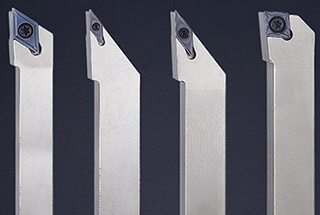
2.9 Tighten the cutting tool securely, and the protrusion length of the cutting tool should generally exceed 2.5 times the thickness of the tool.
2.10 When machining eccentric parts, proper counterweights must be used to balance the chuck’s center of gravity, and the cutting speed should be appropriate.
2.11 When clamping workpieces that extend beyond the machine body, protective measures must be in place.
2.12 When adjusting the tool, do it slowly. When the tool tip is 40-60 millimeters away from the working area of the workpiece, switch to manual or power feed, and then engage in rapid feed to make direct contact.
2.13 When using a file to polish the workpiece, the tool holder should be moved to a safe position. The operator should face the chuck, with the right hand in front and the left hand behind. It is prohibited to use a file to process workpieces with keyways or square holes.
2.14 When using emery cloth to polish the workpiece, the operator should hold both ends of the emery cloth as described above and polish it. It is forbidden to use fingers to hold the emery cloth to grind internal holes.
2.15 When using automatic feed, adjust the small tool holder to be level with the base to prevent the base from touching the chuck.
2.16 When cutting large or heavy workpieces or materials, leave enough machining allowance.
3. Shutdown Procedure
3.1 Cut off the power and remove the workpiece.
3.2 Reset all handles to the zero position, and clean and tidy up the tools and equipment.
3.3 Check the condition of all protective devices.
4. Precautions during Operation
4.1 Non-personnel are strictly prohibited from operating the machine.
4.2 It is strictly prohibited to touch the tools or any rotating parts of the machine during operation.
4.3 Use the emergency stop function properly. After using the emergency stop button in case of an emergency, follow the machine’s startup procedures and recheck everything.
4.4 When using a foot-operated lathe, except as specified, use your foot instead of your hand to operate the handles for the lathe’s guide rail, lead screw, and light rod.
4.5 For parts with sand holes, tapered holes, or keyways on the inner wall, use a triangular scraper to cut the internal hole according to the process requirements.
4.6 The compressed air or liquid pressure of pneumatic or hydraulic chucks must meet the specified value before use.
4.7 When turning long and slender workpieces, if the length extending beyond both ends of the headstock exceeds four times the diameter, use a steady rest, center frame, or follow rest for support. If it extends beyond the tailstock, install protective devices and warning signs.
4.8 When cutting brittle metals or materials that are prone to splashing chips (including face turning), install protective shields, and the operator should wear protective goggles.