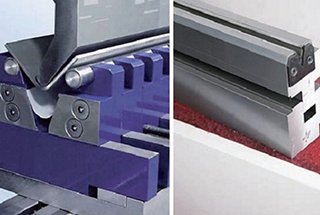
Imagine achieving perfect sheet metal bends without any marks or blemishes. This article dives into advanced techniques that ensure pristine surface quality in metal bending processes. You’ll learn about innovative methods such as using non-metallic materials, roller V-grooves, flip structures, and protective films. By the end, you’ll understand how these techniques minimize friction and pressure, preventing unwanted indentations and enhancing product aesthetics. Explore these solutions to improve the appearance and value of your metalwork.
Sheet metal processing technology has continuously advanced, particularly in applications such as precision bending of stainless steel, decorative stainless steel parts bending, aluminum alloy bending, aircraft parts bending, and copper plate bending, which have increasingly stringent requirements for the surface quality of the formed workpiece.
The conventional bending process, however, tends to cause damage to the workpiece surface, leaving noticeable indentations or scratches on the surface that comes into contact with the mold. This negatively impacts the final product’s appearance and reduces its perceived value to the user.
In this article, we will use the example of bending a V-shaped part to illustrate the intricacies of the sheet metal bending process.
Sheet metal bending is a precise forming operation where a metal sheet is subjected to controlled deformation under pressure from a punch or press brake. This process induces both elastic and plastic deformation in the material, resulting in a permanent shape change.
The bending sequence begins with the initial contact between the punch and the sheet. As the punch descends, the sheet undergoes elastic deformation, followed by plastic deformation once the material’s yield strength is exceeded. During the early stages of plastic bending, the sheet retains some freedom of movement. As the punch continues its downward stroke, the sheet is progressively forced into the V-groove of the die, causing a gradual reduction in both the radius of curvature and the bending force arm.
This dynamic process continues until the punch reaches the end of its stroke. At this point, the sheet makes full contact with the die at three critical points: two along the V-groove shoulders and one at the base. This three-point contact system ensures the precise formation of the desired V-shape.
Throughout the bending operation, the metal sheet experiences a complex stress state. The outer fibers are subjected to tensile stresses, while the inner fibers undergo compression. This stress distribution leads to a phenomenon known as springback, which must be accounted for in the tooling design and process parameters.
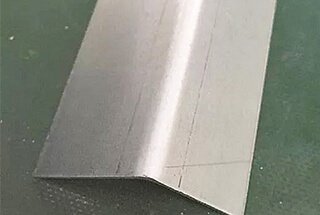
Upon completion of the bending cycle, three distinct indentation lines, commonly referred to as “shoulder marks,” become evident on the workpiece. These marks are a result of the localized pressure exerted by the die shoulders and the base of the V-groove during the forming process, as illustrated in Figures 1 and 2.
The formation and characteristics of shoulder marks are influenced by several interrelated factors, which can be categorized into material properties, tooling geometry, and process parameters. Understanding and controlling these factors is crucial for achieving optimal part quality and minimizing visible markings.
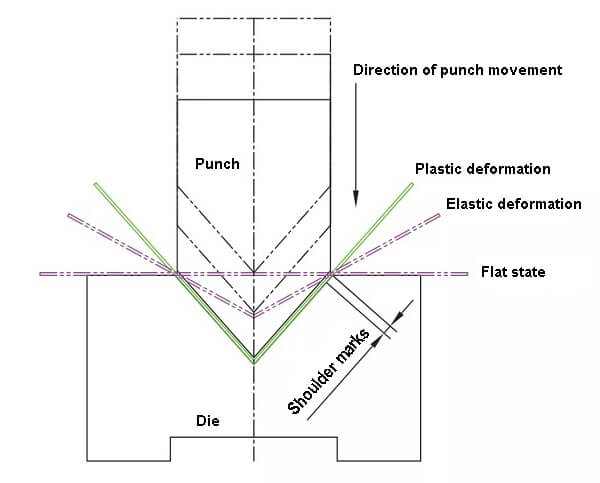
Figure 1 Schematic diagram of the bending process
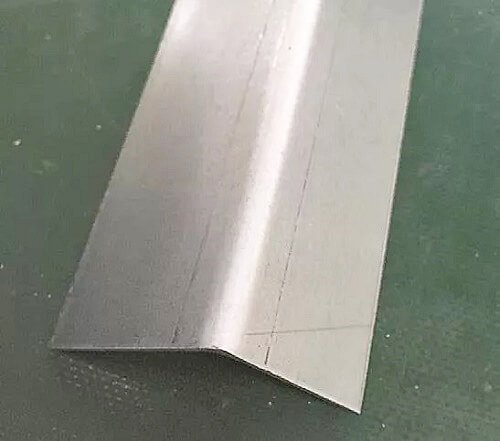
Figure 2 Bending marks
The shoulder marks are primarily associated with the interaction between the sheet metal and the V-die shoulder during the bending process. The clearance between the punch and die significantly influences the compressive stress distribution on the sheet, resulting in varying degrees of indentation likelihood and severity, as illustrated in Figure 3.
Under constant V-die conditions, the magnitude of the bending angle directly correlates with the extent of sheet metal deformation and the length of the friction path at the V-die shoulder. Moreover, a larger bending angle necessitates a prolonged application of bending force by the punch, thereby increasing the duration of contact. This extended contact time, combined with the increased deformation and friction, exacerbates the formation and intensity of shoulder marks on the workpiece surface.
The interplay of these factors—clearance, bending angle, deformation, friction, and contact time—collectively determines the characteristics of the resulting shoulder marks. Understanding and optimizing these parameters is crucial for achieving high-quality bends with minimal surface defects in precision sheet metal fabrication.
When bending metal sheets of varying thicknesses, the chosen V-groove widths also differ.
Under the same conditions for the punch, a larger V-groove size for the matrix leads to a larger indentation width. Conversely, a smaller friction between the metal sheet and the shoulder of the V-groove of the matrix reduces the indentation depth.
Thinner plates result in narrower V-grooves, causing more noticeable marks.
Another factor to consider in terms of friction is the coefficient of friction. Different radii of the V-groove shoulder of the matrix result in varying levels of friction on the sheet during the bending process.
In terms of pressure exerted on the sheet by the V-groove of the matrix, a larger radius of the matrix V-groove reduces the pressure between the sheet and the shoulder of the V-groove of the die, leading to fewer bending marks.
Earlier, we noted that the surface of the V-groove of the matrix can cause friction when it contacts the sheet material.
As the mold wears, the contact between the V-groove and the sheet becomes rougher, and the friction coefficient increases. The sliding of the sheet on the surface of the V-groove results in contact between countless rough bumps and the surface, causing increased pressure on the sheet surface and more noticeable indentations.
Additionally, if the V-groove is not cleaned before bending the workpiece, residual debris on the V-groove can cause obvious indentations due to the pressure it exerts on the sheet. This is a common issue when bending workpieces such as galvanized sheets and carbon steel sheets.
Given that the main cause of bending marks is the friction between the sheet and the V-groove shoulder of the matrix, we can use processing technology to reduce this friction.
The formula for friction force, F=μ×Fn, shows that the factors affecting friction force are the friction coefficient (μ) and the pressure (Fn), both of which are proportional to the friction force.
Therefore, the following four solutions can be used to achieve mark-free bending:

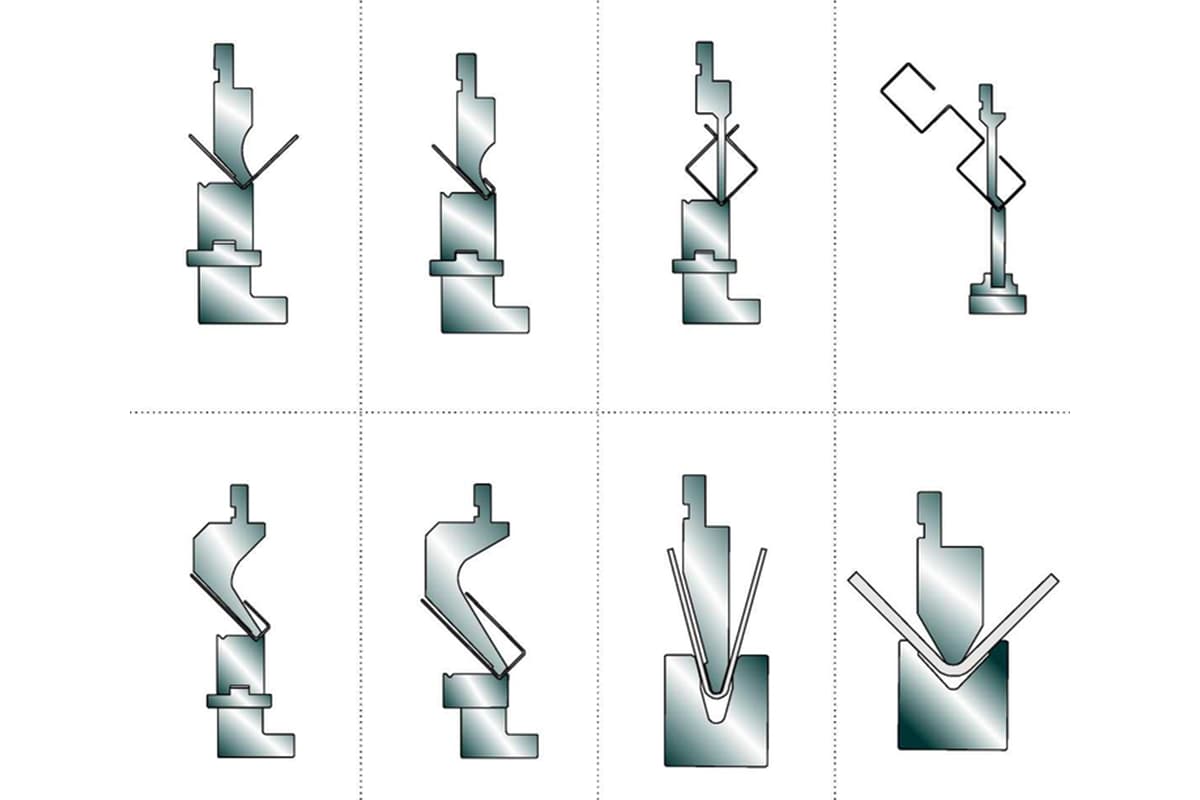
Figure 3 Bending type
The traditional approach of simply increasing the radius of the V-groove shoulder is not a reliable solution for reducing bending indentations.
To decrease the pressure in the friction pair, it is possible to use a softer, non-metallic material for the V-groove shoulder, such as nylon or urethane (PU elastomer), as long as the necessary extrusion effect is maintained. However, these materials have the drawback of being prone to wear and requiring frequent replacement.
Currently, there are various V-groove structures that utilize these materials, as illustrated in Figure 4.
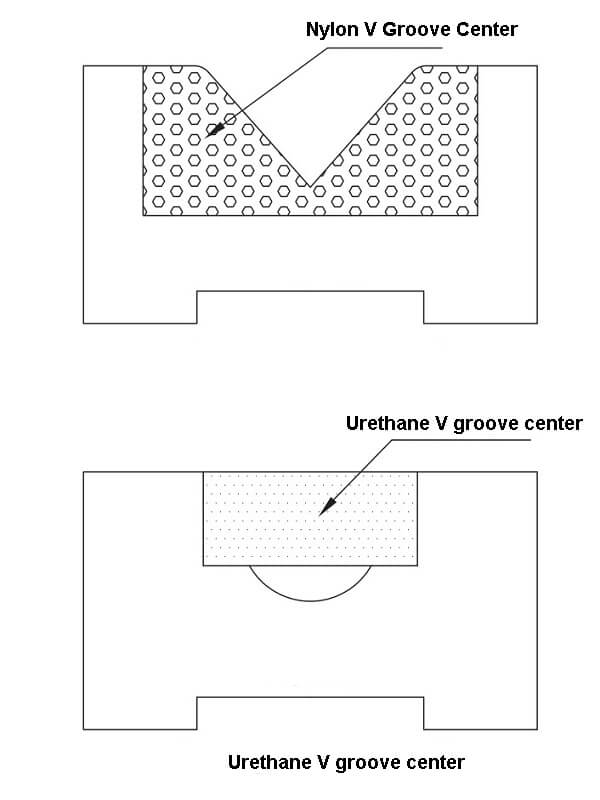
Figure 4 Schematic diagram of non-metallic V-groove structure
Moreover, with the aim of reducing the friction coefficient between the sheet and the V-groove, the sliding friction pair between the sheet and the V-groove shoulder can be transformed into a rolling friction pair, thereby significantly reducing the friction force acting on the sheet.
This can effectively prevent bending indentation.
Currently, this method is widely used in the mold industry, and the ball mark-free bending mold (Figure 5) is a common application example.

Figure 5 Ball mark free bending mold
To avoid rigid friction between the ball mark-free bending mold roller and the V-groove, and to facilitate the roller’s rotation and lubrication, balls are added to reduce pressure and friction coefficient.
As a result, parts processed by the ball mark-free bending mold generally do not exhibit visible marks, but the mark-free bending effect is not optimal for soft materials such as aluminum and copper.
From a financial perspective, the structure of the ball mark-free bending mold is more complicated than previous mold designs, resulting in higher processing costs and difficulties in maintenance. These factors should be taken into account by enterprise managers when choosing tooling.
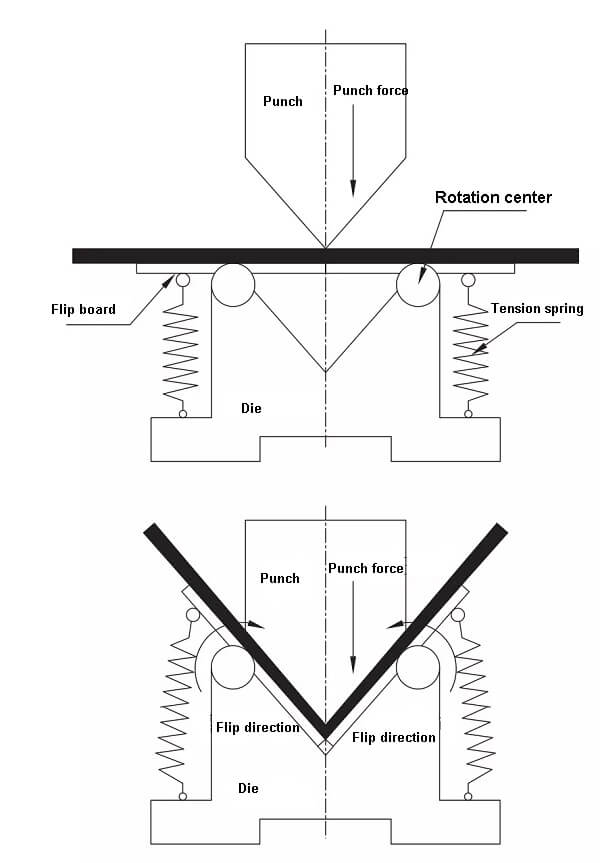
Figure 6 Schematic diagram of the inverted V-groove structure
Currently, there is another type of mold in the industry that uses the principle of pivot rotation to achieve part bending by rotating the matrix shoulder.
This mold design departs from the traditional V-groove structure by transforming the inclined surfaces on either side of the V-groove into a reversible structure.
During the sheet pressing by the punch, the turning mechanism on both sides of the punch is activated by the pressure of the punch, causing the sheet to bend and form, as depicted in Figure 6.
Under this operating condition, there is minimal sliding friction between the sheet and the matrix, and the sheet moves closer to the vertex of the punch near the turning plane to prevent marks on the parts.
The structure of this type of mold is more complex than previous designs, with a tension spring and flip plate structure, resulting in higher maintenance and processing costs.
The methods previously discussed are all aimed at achieving mark-free bending by modifying the bending molds.
From a business perspective, it may not be feasible to develop and purchase a new set of molds for mark-free bending of individual parts.
From the perspective of friction contact, as long as the mold is separated from the sheet, friction does not occur.
Therefore, without changing the bending die, mark-free bending can be achieved by using a soft film to prevent contact between the V-groove and the sheet.
This soft film, also known as mark-free bending film, is commonly made of materials such as rubber, PVC (polyvinyl chloride), PE (polyethylene), and PU (polyurethane).
Rubber and PVC have lower raw material costs, but they lack pressure resistance, have poor protection performance, and have a short service life.
PE and PU, on the other hand, are excellent engineering materials. The mark-free bending and pressing film made with them as the substrate has good tear resistance and a long service life, providing good protection.
The bending protection film functions as a buffer between the workpiece and the mold shoulder, alleviating the pressure between the mold and the sheet, and thereby preventing the workpiece from being scratched during bending.
When in use, the bending film can be placed on the matrix, offering low cost and easy usage.
Currently, the thickness of commercially available mark-free bending film is typically 0.5mm, and the size can be customized according to needs.
Under the condition of 2t pressure, the mark-free bending film can usually reach a service life of about 200 bending cycles, and it boasts strong abrasion resistance, excellent tear resistance, superior bending performance, high tensile strength and elongation, resistance to lubricants, and resistance to aliphatic hydrocarbon solvents.
This article has outlined several methods for achieving mark-free bending, and Table 1 provides a comparison of these methods.
Table 1 Comparison of mark free bending process
| Contrast item | Nylon type V groove | Urethane V-groove | Roller V groove | Flip type groove | Mark free bending foil |
|---|---|---|---|---|---|
| Bending angle | Various angles | Arc | Various angles | Commonly used at right angles | Various angles |
| Applicable sheet | Various plates | Various plates | Non-aluminum copper and other soft plates | Various plates | Various plates |
| Length limitation | ≥50mm | ≥200mm | 100mm | / | / |
| Service life | 15 ~ 200,000 times | 10 ~ 150,000 times | / | / | 200 times |
| Replacement maintenance | Replace nylon | Replacement of PU block | Replace the roller | Integral replacement or replace accessories such as extension springs | Integral replacement |
| Cost | Low | Low | Expensive | Expensive | Low |
| Advantage | Low cost and suitable for mark-free bending of a wide range of plates, using the same approach as the lower die of a standard bending machine. | Low cost, suitable for mark free bending of various plates | Long life | Suitable for mark free bending of various plates | Low cost, using the same method as standard die |
| Limitation | Shorter life than standard molds, segment size is limited to above 50mm | Currently, it is only applicable to mark-free bending of arc-shaped products. | This method has a high cost, and its mark-free bending effect on soft materials such as aluminum and copper is not optimal. The friction and deformation of the balls are challenging to control, leading to potential marks on other rigid plates, and it has more restrictive requirements for length and slot. | Expensive, small scope, limited length and V opening | It has a shorter lifespan compared to other solutions, frequent replacement reduces production efficiency, and the cost increases significantly when used in large quantities. |
The competition in the sheet metal processing industry is intense, and in order to stay competitive, companies need to constantly improve their processing technology. They should not only consider the functionality of the product, but also its processability, appearance, and processing economy. By utilizing more efficient and cost-effective processing methods, companies can make their products easier to process, more economical, and more attractive.
