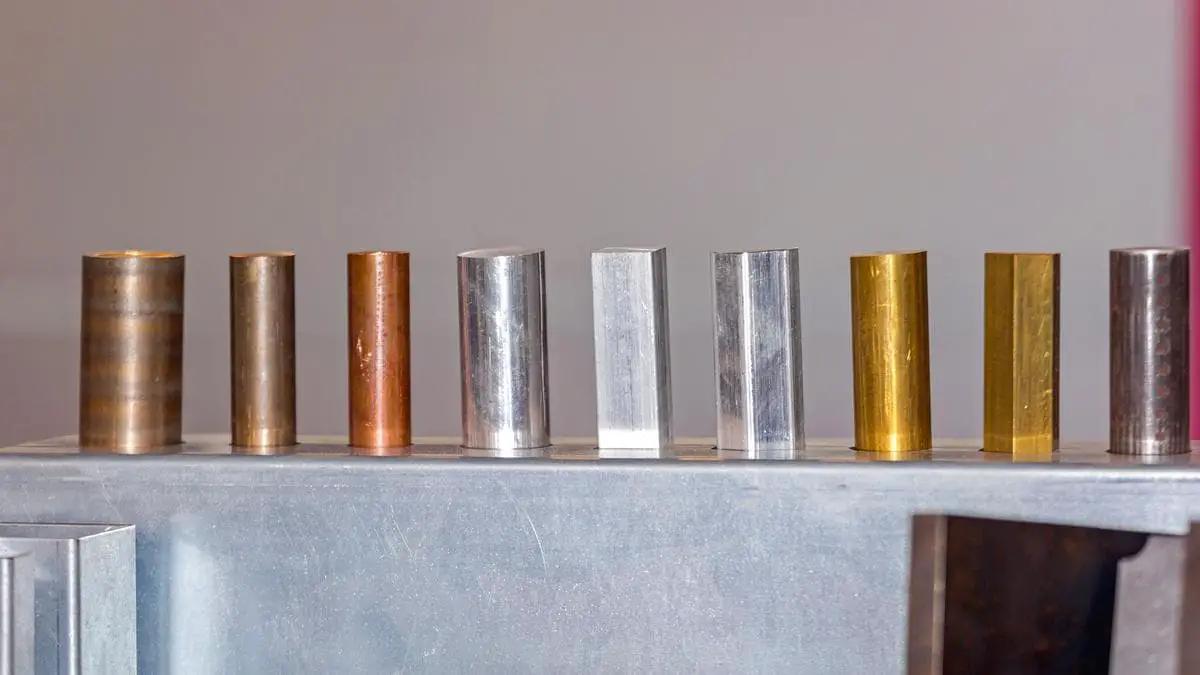
Have you ever wondered about the fascinating world of metal hardness? In this blog post, we’ll dive into the intriguing concepts and methods behind measuring and enhancing the hardness of various metals. As an experienced mechanical engineer, I’ll share my insights and knowledge to help you better understand this crucial aspect of material science. Get ready to uncover the secrets of metal hardness and discover how it impacts our everyday lives!
The Mohs Hardness Scale, created by Friedrich Mohs in 1812, is a simple way to measure how easily minerals can scratch each other. This qualitative ordinal scale ranks minerals from 1 to 10, with each number representing a mineral’s ability to scratch those below it and be scratched by those above it. The scale goes from talc, the softest mineral at 1, to diamond, the hardest at 10.
The Mohs scale was originally developed to assist geologists in identifying minerals in the field. It provides an easy and effective method to classify minerals based on their scratch hardness, which is determined by observing whether a mineral can scratch another material or be scratched by it. This makes the scale a practical tool for geologists and mineralogists.
The Rockwell Hardness Test measures how hard metals and other materials are by pressing an indenter into them and measuring the indentation.
Different Rockwell scales use different indenters and loads, like HRA for thin steel, HRB for softer metals, and HRC for harder materials.
This method is quick and straightforward, requiring minimal sample preparation and suitable for a wide range of materials. However, it is less precise for very thin materials or surface coatings and may not be suitable for materials with non-uniform hardness.
The Brinell Hardness Test uses a hard spherical indenter to press into the material and measures the indentation diameter to calculate hardness.
This test involves pressing a tungsten carbide ball into the material under a specific load for a set period. The diameter of the indentation is measured and used to calculate the Brinell Hardness Number (BHN).
This test is great for large parts and coarse materials but not suitable for very hard or thin materials.
The Vickers Hardness Test uses a diamond pyramid indenter to measure the hardness of various materials, including metals and ceramics.
The Vickers test involves pressing a diamond pyramid indenter with a square base into the material under a specified load. The diagonals of the resulting indentation are measured to calculate the Vickers Hardness Number (VHN).
This test is very precise and works for all materials, but it can be slower and more expensive.
The Mohs hardness is a standard for representing mineral hardness, first proposed in 1822 by German mineralogist Frederich Mohs. It is a standard used in mineralogy or gemology. Mohs hardness is determined by using a diamond pyramid needle to scratch the surface of the tested mineral and measure the depth of the scratch. The depth of this scratch is the Mohs hardness, represented by the symbol HM. It is also used to indicate the hardness of other materials.
The depth of the measured scratch is divided into ten levels to represent hardness (scratch method): talc 1 (smallest hardness), gypsum 2, calcite 3, fluorite 4, apatite 5, orthoclase (feldspar) 6, quartz 7, topaz 8, corundum 9, diamond 10. The hardness of the tested mineral is determined by comparing scratches with the standard minerals in the Mohs hardness tester. Although the measurement of this method is rough, it is convenient and practical. It is often used to measure the hardness of natural minerals.
Hardness values are not absolute hardness values, but values represented in order of hardness.
When applying, compare the hardness by scratching. For example, if a mineral can scratch calcite but not fluorite, its Mohs hardness is 3 to 4, and others are inferred. Mohs hardness is only relative hardness, which is rough. The hardness of talc is 1, diamond is 10, and corundum is 9, but the absolute hardness measured by a microhardness tester is 4192 times that of talc for diamond, and 442 times that of talc for corundum. Mohs hardness is convenient to use and is often used in field operations. For example, the hardness of fingernails is about 2.5, copper coins are 3.5-4, steel knives are 5.5, and glass is 6.5.
In addition to the original list of 1 to 10 kinds of minerals, the hardness values of common metals are listed here for reference.
| Metal | Element | Hardness (Mohs) |
| Carbon(diamond) | C | 10 |
| Boron | B | 9.3 |
| Titanium Carbide | Ti+C | 9 |
| Tungsten Carbide | W+C | 9 |
| Chromium | Cr | 8.5 |
| Tungsten | W | 7.5 |
| Vanadium | V | 7 |
| Rhenium | Re | 7 |
| Osmium | Os | 7 |
| Silicon | Si | 6.5 |
| Ruthenium | Ru | 6.5 |
| Tantalum | Ta | 6.5 |
| Iridium | Ir | 6.5 |
| Titanium | Ti | 6 |
| Manganese | Mn | 6 |
| Germanium | Ge | 6 |
| Niobium | Nb | 6 |
| Rhodium | Rh | 6 |
| Uranium | U | 6 |
| Beryllium | Be | 6 |
| Molybdenum | Mo | 5.5 |
| Hafnium | Hf | 5.5 |
| Cobalt | Co | 5 |
| Zirconium | Zr | 5 |
| Palladium | Pd | 4.75 |
| White Gold | Au+Ni+Pd | 4 |
| Steel | Fe+C | 4 |
| Iron | Fe | 4 |
| Nickel | Ni | 4 |
| Arsenic | As | 3.5 |
| Platinum | Pt | 3.5 |
| Brass | Cu+Zn | 3 |
| Bronze | Cu+Sn | 3 |
| Copper | Cu | 3 |
| Antimony | Sb | 3 |
| Thorium | Th | 3 |
| Aluminum | Al | 2.75 |
| Magnesium | Mg | 2.5 |
| Zinc | Zn | 2.5 |
| Silver | Ag | 2.5 |
| Lanthanum | La | 2.5 |
| Cerium | Ce | 2.5 |
| Gold | Au | 2.5 |
| Tellurium | Te | 2.25 |
| Bismuth | Bi | 2.25 |
| Cadmium | Cd | 2 |
| Calcium | Ca | 1.75 |
| Gallium | Ga | 1.5 |
| Strontium | Sr | 1.5 |
| Tin | Sn | 1.5 |
| Mercury | Hg | 1.5 |
| Lead | Pb | 1.5 |
| Barium | Ba | 1.25 |
| Indium | In | 1.2 |
| Thallium | Ti | 1.2 |
| Lithium | Li | 1.2 |
| Sodium | Na | 0.5 |
| Potassium | K | 0.4 |
| Rubidium | Rb | 0.3 |
| Caesium | Cs | 0.2 |
| No. | Material Code | Strength Grade | Hardness Value(HB) |
| 01 | 1Cr13 | 440(45) | 197~229 |
| 355 | 187~229 | ||
| 02 | 1Cr12Mo | 550 | 229~255 |
| 450 | 197~229 | ||
| 03 | Cr11MoV | 490(50) | 217~248 |
| 390 | 192~241 | ||
| 590 | 235~269 | ||
| 04 | Cr12WMoV | 590 | 235~269 |
| 690 | 269~302 | ||
| 05 | 2Cr12NiMoWV | 760 | 293~331 |
| 06 | ZG20CrMoV | 310 | 140~201 |
| 07 | 25Cr2MoVA | 590 | 241~277 |
| 735 | 269~302 | ||
| 08 | 30Cr2MoV | 440 | 179~229 |
| 590 | 241~277 | ||
| 735 | 269~302 | ||
| 09 | 38CrMoAl | 590 | 241~277 |
| 685 | 277~302 | ||
| 785 | 293~321 | ||
| 10 | A3 | Hardness after Nitriding Component Normalizing | <131 |
| 11 | 15# | <143 | |
| 12 | 25# | <170 | |
| 13 | ZG25 | <170 | |
| 14 | 20CrA | <179 | |
| 15 | 12CrNi3A | <252 | |
| 16 | 2Cr13 | 490 | 217~248 |
| 590 | 235~269 | ||
| 17 | 2Cr12NiW1Mo1V | 735 | 285~302 |
| 18 | 0Cr17Ni4Cu4Nb | 590 | 262~302 |
| 760 | 277~311 | ||
| 19 | Cr5Mo | / | 248~302 |
| 20 | GH132(GBn181-82) | / | 284~349 |
| 21 | GH136(GBn181-82) | / | 298~390 |
| 22 | R-26 | 550 | 262~331 |
| 23 | 3Cr13 | 590 | 235~269 |
| 685 | 269~302 | ||
| 23 | 3Cr13 | 785 | 286~321 |
| 24 | 1Cr18Ni9Ti | 205(225) | ≦187 |
| 25 | 0Cr18Ni9 | 205 | ≦187 |
| 26 | 1Cr18Ni9 | 205 | ≦187 |
| 27 | Cr15Ni3Bw3Ti | 390 | 207~255 |
| 28 | 34CrMo1A | 490(590) | / |
| 29 | 30Cr2MoV | 590 | 241~277 |
| 690 | 256~287 | ||
| 735 | 269~302 | ||
| 30 | 34CrNi3Mo | 590 | 220~260 |
| 690 | 240~282 | ||
| 735 | 255~284 | ||
| 785 | 271~298 | ||
| 31 | 30Cr2Ni4MoV | 550 | 207~262 |
| 690 | 241~302 | ||
| 760 | 262~321 | ||
| 830 | 285~341 | ||
| 32 | 15CrMoA | 245 | 131~163 |
| 490 | 207~241 | ||
| 33 | 15Cr1Mo | 275 | ≦207 |
| 34 | 12Cr1MoVA | 245 | 131~163 |
| 35 | 12Cr2Mo1 | 275 | ≦197 |
| 315 | ≦207 | ||
| 36 | 15Cr1Mo1VA | 325 | 146~196 |
| 37 | 25# | 235(215) | 110~170 |
| 38 | 30# | 265 | ≦187 |
| 39 | 35# | 265 | 156~217 |
| 255 | 140~187 | ||
| 235 | 121~187 | ||
| 40 | 45# | 295 | 162~217 |
| 285 | 149~217 | ||
| 440 | 197~229 | ||
| 345 | 217~255 | ||
| 41 | 15CrMoA | 245 | 131~163 |
| 490 | 207~241 | ||
| 42 | 20MnMo | 350 | 149~217 |
| 43 | 40CrNi3MoA | 550 | 207~262 |
| 690 | 241~302 | ||
| 44 | 15CrMoA | 490 | 207~241 |
| 45 | 40CrA | 390 | 192~223 |
| 45 | 40CrA | 490 | 217~235 |
| 590 | 241~277 | ||
| 685 | 269~302 | ||
| 46 | 40CrNi2MoA | 540 | 207~269 |
| 640 | 248~277 | ||
| 785 | 269~321 | ||
| 47 | 35CrMoA | 490 | 217~255 |
| 590 | 241~277 | ||
| 48 | 40CrNiMoA | 690 | 255~293 |
| 49 | 20Cr1Mo1VtiB | 690 | 255~293 |
| 50 | 30Cr1Mo1V | 590 | 241~277 |
| 51 | 30Cr1Mo1V | 690 | 255~285 |
| Materials | Reference Standards and Requirements(HB) | Control Scope(HB) | Note |
| 210C | ASTM A210,≤179 | 130~179 | |
| T1a, 20MoG, STBA12, 15Mo3 | ASTM A209,≤153 | 125~153 | |
| T2, T11, T12, T21, T22, 10CrMo910 | ASTM A213,≤163 | 120~163 | |
| P2, P11, P12, /P21, P22, 10CrMo910 | 125~179 | ||
| P2, P11, P12, /P21P22, 10CrMo910 type pipe fittings | 130~197 | The lower limit of the weld seam must not be less than that of the base material,upper limit≤241 | |
| T23 | ASTM A213,≤220 | 150~220 | |
| 12Cr2MoWVTiB(G102) | 150~220 | ||
| T24 | ASTM A213,≤250 | 180~250 | |
| T/P91, T/P92, T911, T/P122 | ASTM A213,≤250ASTM A335,≤250 | 180~250 | The hardness of “P” type pipes refers to that of “T” type pipes. |
| (T/P91, T/P92, T911, T/P122)Weld Seam | 180~270 | ||
| WB36 | ASME code case2353,≤252 | 180~252 | The weld seam must not be less hard than the base material. |
| A515, A106B, A106C, A672 B70 type pipe fittings | 130~197 | The lower limit of the weld seam must not be less than the base material, with the upper limit≤241. | |
| 12CrMo | GB3077,≤179 | 120~179 | |
| 15CrMo | JB4726,118~180(Rm:440~610)JB4726,115~178(Rm:430~600) | 118~180115~178 | |
| 12Cr1MoV | GB3077,≤179 | 135~179 | |
| 15Cr1Mo1V | 135~180 | ||
| F2(Forged or Rolled Pipe Fittings, Valves, and Components) | ASTM A182,143~192 | 143~192 | |
| F11,Class 1 | ASTM A182,121~174 | 121~174 | |
| F11,Class 2 | ASTM A182,143~207 | 143~207 | |
| F11,Class 3 | ASTM A182,156~207 | 156~207 | |
| F12,Class 1 | ASTM A182,121~174 | 121~174 | |
| F12,Class 2 | ASTM A182,143~207 | 143~207 | |
| F22,Class 1 | ASTM A182, ≤170 | 130~170 | |
| F22,Class 3 | ASTM A182,156~207 | 156~207 | |
| F91 | ASTM A182, ≤248 | 175~248 | |
| F92 | ASTM A182, ≤269 | 180~269 | |
| F911 | ASTM A182, 187~248 | 187~248 | |
| F122 | ASTM A182, ≤250 | 177~250 | |
| 20 Pressure Vessel Carbon Steel and Low Alloy Steel Forgings | JB4726,106~159 | 106~159 | |
| 35 (Note: The Rm in the table refers to the tensile strength of the material, measured in MPa.) | JB4726,136~200(Rm:510~670)JB4726,130~190(Rm:490~640) | 136~200130~190 | |
| 16Mn | JB4726,121~178(Rm:450~600) | 121~178 | |
| 20MnMo | JB4726,156~208(Rm:530~700)JB4726,136~201(Rm:510~680)JB4726,130~196(Rm:490~660) | 156~208136~201130~196 | |
| 35CrMo | JB4726,185~235(Rm:620~790)JB4726,180~223(Rm:610~780) | 185~235180~223 | |
| 0Cr18Ni90Cr17Ni12Mo2 | JB4728,139~187(Rm:520)JB4728,131~187(Rm:490) | 139~187131~187 | Stainless Steel Forgings for Pressure Vessels |
| 1Cr18Ni9 | GB1220 ≤187 | 140~187 | |
| 0Cr17Ni12Mo2 | GB1220 ≤187 | 140~187 | |
| 0Cr18Ni11Nb | GB1220 ≤187 | 140~187 | |
| TP304H, TP316H, TP347H | ASTM A213,≤192 | 140~192 | |
| 1Cr13 | 192~211 | Moving Blades | |
| 2Cr13 | 212~277 | Moving Blades | |
| 1Cr11MoV | 212~277 | Moving Blades | |
| 1Cr12MoWV | 229~311 | Moving Blades | |
| ZG20CrMo | JB/T 7024,135~180 | 135~180 | |
| ZG15Cr1Mo | JB/T 7024,140~220 | 140~220 | |
| ZG15Cr2Mo1 | JB/T 7024,140~220 | 140~220 | |
| ZG20CrMoV | JB/T 7024,140~220 | 140~220 | |
| ZG15Cr1Mo1V | JB/T 7024,140~220 | 140~220 | |
| 35 | DL/T439,146~196 | 146~196 | Bolt |
| 45 | DL/T439,187~229 | 187~229 | Bolt |
| 20CrMo | DL/T439,197~241 | 197~241 | Bolt |
| 35CrMo | DL/T439,241~285 | 241~285 | Bolt(Dia.>50mm) |
| 35CrMo | DL/T439,255~311 | 255~311 | Bolt(Dia.≤50mm) |
| 42CrMo | DL/T439,248~311 | 248~311 | Bolt(Dia.>65mm) |
| 42CrMo | DL/T439,255~321 | 255~321 | Bolt(Dia.≤65mm) |
| 25Cr2MoV | DL/T439,248~293 | 248~293 | Bolt |
| 25Cr2Mo1V | DL/T439,248~293 | 248~293 | Bolt |
| 20Cr1Mo1V1 | DL/T439,248~293 | 248~293 | Bolt |
| 20Cr1Mo1VTiB | DL/T439,255~293 | 255~293 | Bolt |
| 20Cr1Mo1VNbTiB | DL/T439,252~302 | 252~302 | Bolt |
| 20Cr12NiMoWV(C422) | DL/T439,277~331 | 277~331 | Bolt |
| 2Cr12NiW1Mo1V | Eastern Steam Turbine Factory Standard | 291~321 | Bolt |
| 2Cr11Mo1NiWVNbN | Eastern Steam Turbine Factory Standard | 290~321 | Bolt |
| 45Cr1MoV | Eastern Steam Turbine Factory Standard | 248~293 | Bolt |
| R-26(Ni-Cr-Co Alloy) | DL/T439,262~331 | 262~331 | Bolt |
| GH445 | DL/T439,262~331 | 262~331 | Bolt |
| ZG20CrMo | JB/T7024,135~180 | 135~180 | Cylinder |
| ZG15Cr1Mo, ZG15Cr2MoZG20Cr1MoV, ZG15Cr1Mo1V | JB/T7024,140~220 | 140~220 | Cylinder |
| Non-ferrous Metal Hardness | Tensile strength δb/MPa | |||||||||||||||
|---|---|---|---|---|---|---|---|---|---|---|---|---|---|---|---|---|
| Rockwell | Surface Rockwell | Vickers | Brinell (F/D2=30) | |||||||||||||
| HRC | HRA | HR15N | HR30N | HR45N | HV | HBS | HBW | MS | Cr.S | Cr-V.S | CrNi.S | Cr-Mo.S | Cr-Ni-Mo .S | CrMnSi.S | UHSS | S.S |
| 20.0 | 60.2 | 68.8 | 40.7 | 19.2 | 226 | 225 | 225 | 774 | 742 | 736 | 782 | 747 | / | 781 | / | 740 |
| 20.5 | 60.4 | 69.0 | 41.2 | 19.8 | 228 | 227 | 227 | 784 | 751 | 744 | 787 | 753 | / | 788 | / | 749 |
| 21.0 | 60.7 | 69.3 | 41.7 | 20.4 | 230 | 229 | 229 | 793 | 760 | 753 | 792 | 760 | / | 794 | / | 758 |
| 21.5 | 61.0 | 69.5 | 42.2 | 21.0 | 233 | 232 | 232 | 803 | 769 | 761 | 797 | 767 | / | 801 | / | 767 |
| 22.0 | 61.2 | 69.8 | 42.6 | 21.5 | 235 | 234 | 234 | 813 | 779 | 770 | 803 | 774 | / | 809 | / | 777 |
| 22.5 | 61.5 | 70.0 | 43.1 | 22.1 | 238 | 237 | 237 | 823 | 788 | 779 | 809 | 781 | / | 816 | / | 786 |
| 23.0 | 61.7 | 70.3 | 43.6 | 22.7 | 24l | 240 | 240 | 833 | 798 | 788 | 815 | 789 | / | 824 | / | 796 |
| 23.5 | 62.0 | 70.6 | 44.0 | 23.3 | 244 | 242 | 242 | 843 | 808 | 797 | 822 | 797 | / | 832 | / | 806 |
| 24.0 | 62.2 | 70.8 | 44.5 | 23.9 | 247 | 245 | 245 | 854 | 818 | 807 | 829 | 805 | / | 840 | / | 816 |
| 24.5 | 62.5 | 71.1 | 45.0 | 24.5 | 250 | 248 | 248 | 864 | 828 | 816 | 836 | 813 | / | 848 | / | 826 |
| 25.0 | 62.8 | 71.4 | 45.5 | 25.1 | 253 | 251 | 251 | 875 | 838 | 826 | 843 | 822 | / | 856 | / | 837 |
| 25.5 | 63.0 | 71.6 | 45.9 | 25.7 | 256 | 254 | 254 | 886 | 848 | 837 | 851 | 831 | 850 | 865 | / | 847 |
| 26.0 | 63.3 | 71.9 | 46.4 | 26.3 | 259 | 257 | 257 | 897 | 859 | 847 | 859 | 840 | 859 | 874 | / | 858 |
| 26.5 | 63.5 | 72.2 | 46.9 | 26.9 | 262 | 260 | 260 | 908 | 870 | 858 | 867 | 850 | 869 | 883 | / | 868 |
| 27.0 | 63.8 | 72.4 | 47.3 | 27.5 | 266 | 263 | 263 | 919 | 880 | 869 | 876 | 860 | 879 | 893 | / | 879 |
| 27.5 | 64.0 | 72.7 | 47.8 | 28.1 | 269 | 266 | 266 | 930 | 891 | 880 | 885 | 870 | 890 | 902 | / | 890 |
| 28.0 | 64.3 | 73.0 | 48.3 | 28.7 | 273 | 269 | 269 | 942 | 902 | 892 | 894 | 880 | 901 | 912 | / | 901 |
| 28.5 | 64.6 | 73.3 | 48.7 | 29.3 | 276 | 273 | 273 | 954 | 914 | 903 | 904 | 891 | 912 | 922 | / | 913 |
| 29.0 | 64.8 | 73.5 | 49.2 | 29.9 | 280 | 276 | 276 | 965 | 925 | 915 | 914 | 902 | 923 | 933 | / | 924 |
| 29.5 | 65.1 | 73.8 | 49.7 | 30.5 | 284 | 280 | 280 | 977 | 937 | 928 | 924 | 913 | 935 | 943 | / | 936 |
| 30.0 | 65.3 | 74.1 | 50.2 | 31.1 | 288 | 283 | 283 | 989 | 948 | 940 | 935 | 924 | 947 | 954 | / | 947 |
| 30.5 | 65.6 | 74.4 | 50.6 | 31.7 | 292 | 287 | 287 | 1002 | 960 | 953 | 946 | 936 | 959 | 965 | / | 959 |
| 31.0 | 65.8 | 74.7 | 51.1 | 32.3 | 296 | 29l | 29l | 1014 | 972 | 966 | 957 | 948 | 972 | 977 | / | 971 |
| 31.5 | 66.1 | 74.9 | 51.6 | 32.9 | 300 | 294 | 294 | 1027 | 984 | 980 | 969 | 961 | 985 | 989 | / | 983 |
| 32.0 | 66.4 | 75.2 | 52.0 | 33.5 | 304 | 298 | 298 | 1039 | 996 | 993 | 981 | 974 | 999 | 1001 | / | 996 |
| 32.5 | 66.6 | 75.5 | 52.5 | 34.1 | 308 | 302 | 302 | 1052 | 1009 | 1007 | 994 | 987 | 1012 | 1013 | / | 1008 |
| 33.0 | 66.9 | 75.8 | 53.0 | 34.7 | 313 | 306 | 306 | 1065 | 1022 | 1022 | 1007 | 1001 | 1027 | 1026 | / | 1021 |
| 33.5 | 67.1 | 76.1 | 53.4 | 35.3 | 317 | 310 | 310 | 1078 | 1034 | 1036 | 1020 | 1015 | 1041 | 1039 | / | 1034 |
| 34.0 | 67.4 | 76.4 | 53.9 | 35.9 | 32l | 314 | 314 | 1092 | 1048 | 1051 | 1034 | 1029 | 1056 | 1052 | / | 1047 |
| 34.5 | 67.7 | 76.7 | 54.4 | 36.5 | 326 | 318 | 318 | 1105 | 1061 | 1067 | 1048 | 1043 | 1071 | 1066 | / | 1060 |
| 35.0 | 67.9 | 77.0 | 54.8 | 37.0 | 33l | 323 | 323 | 1119 | 1074 | 1082 | 1063 | 1058 | 1087 | 1079 | / | 1074 |
| 35.5 | 68.2 | 77.2 | 55.3 | 37.6 | 335 | 327 | 327 | 1133 | 1088 | 1098 | 1078 | 1074 | 1103 | 1094 | / | 1087 |
| 36.0 | 68.4 | 77.5 | 55.8 | 38.2 | 340 | 332 | 332 | 1147 | 1102 | 1114 | 1093 | 1090 | 1119 | 1108 | / | 1101 |
| 36.5 | 68.7 | 77.8 | 56.2 | 38.8 | 345 | 336 | 336 | 1162 | 1116 | 1131 | 1109 | 1106 | 1136 | 1123 | / | 1116 |
| 37.0 | 69.0 | 78.1 | 56.7 | 39.4 | 350 | 341 | 341 | 1177 | 1131 | 1148 | 1125 | 1122 | 1153 | 1139 | / | 1130 |
| 37.5 | 69.2 | 78.4 | 57.2 | 40.0 | 355 | 345 | 345 | 1192 | 1146 | 1165 | 1142 | 1139 | 1171 | 1155 | / | 1145 |
| 38.0 | 69.5 | 78.7 | 57.6 | 40.6 | 360 | 350 | 350 | 1207 | 1161 | 1183 | 1159 | 1157 | 1189 | 1171 | / | 1161 |
| 38.5 | 69.7 | 79.0 | 58.1 | 41.2 | 365 | 355 | 355 | 1222 | 1176 | 1201 | 1177 | 1174 | 1207 | 1187 | 1170 | 1176 |
| 39.0 | 70.0 | 79.3 | 58.6 | 41.8 | 37l | 360 | 360 | 1238 | 1192 | 1219 | 1195 | 1192 | 1226 | 1204 | 1195 | 1193 |
| 39.5 | 70.3 | 79.6 | 59.0 | 42.4 | 376 | 365 | 365 | 1254 | 1208 | 1238 | 1214 | 1211 | 1245 | 1222 | 1219 | 1209 |
| 40.0 | 70.5 | 79.9 | 59.5 | 43.0 | 381 | 370 | 370 | 1271 | 1225 | 1257 | 1233 | 1230 | 1265 | 1240 | 1243 | 1226 |
| 40.5 | 70.8 | 80.2 | 60.0 | 43.6 | 387 | 375 | 375 | 1288 | 1242 | 1276 | 1252 | 1249 | 1285 | 1258 | 1267 | 1244 |
| 41.0 | 71.1 | 80.5 | 60.4 | 44.2 | 393 | 380 | 381 | 1305 | 1260 | 1296 | 1273 | 1269 | 1306 | 1277 | 1290 | 1262 |
| 41.5 | 71.3 | 80.8 | 60.9 | 44.8 | 398 | 385 | 386 | 1322 | 1278 | 1317 | 1293 | 1289 | 1327 | 1296 | 1313 | 1280 |
| 42.0 | 71.6 | 81.1 | 61.3 | 45.4 | 404 | 39l | 392 | 1340 | 1296 | 1337 | 1314 | 1310 | 1348 | 1316 | 1336 | 1299 |
| 42.5 | 71.8 | 81.4 | 61.8 | 45.9 | 410 | 396 | 397 | 1359 | 1315 | 1358 | 1336 | 1331 | 1370 | 1336 | 1359 | 1319 |
| 43.0 | 72.1 | 81.7 | 62.3 | 46.5 | 416 | 40l | 403 | 1378 | 1335 | 1380 | 1358 | 1353 | 1392 | 1357 | 1381 | 1339 |
| 43.5 | 72.4 | 82.0 | 62.7 | 47.1 | 422 | 407 | 409 | 1397 | 1355 | 1401 | 1380 | 1375 | 1415 | 1378 | 1404 | 1361 |
| 44.0 | 72.6 | 82.3 | 63.2 | 47.7 | 428 | 413 | 415 | 1417 | 1376 | 1424 | 1404 | 1397 | 1439 | 1400 | 1427 | 1383 |
| 44.5 | 72.9 | 82.6 | 63.6 | 48.3 | 435 | 418 | 422 | 1438 | 1398 | 1446 | 1427 | 1420 | 1462 | 1422 | 1450 | 1405 |
| 45.0 | 73.2 | 82.9 | 64.1 | 48.9 | 44l | 424 | 428 | 1459 | 1420 | 1469 | 1451 | 1444 | 1487 | 1445 | 1473 | 1429 |
| 45.5 | 73.4 | 83.2 | 64.6 | 49.5 | 448 | 430 | 435 | 1481 | 1444 | 1493 | 1476 | 1468 | 1512 | 1469 | 1496 | 1453 |
| 46.0 | 73.7 | 83.5 | 65.0 | 50.1 | 454 | 436 | 44l | 1503 | 1468 | 1517 | 1502 | 1492 | 1537 | 1493 | 1520 | 1479 |
| 46.5 | 73.9 | 83.7 | 65.5 | 50.7 | 46l | 442 | 448 | 1526 | 1493 | 1541 | 1527 | 1517 | 1563 | 1517 | 1544 | 1505 |
| 47.0 | 74.2 | 84.0 | 65.9 | 51.2 | 468 | 449 | 455 | 1550 | 1519 | 1566 | 1554 | 1542 | 1589 | 1543 | 1569 | 1533 |
| 47.5 | 74.5 | 84.3 | 66.4 | 51.8 | 475 | / | 463 | 1575 | 1546 | 1591 | 1581 | 1568 | 1616 | 1569 | 1594 | 1562 |
| 48.0 | 74.7 | 84.6 | 66.8 | 52.4 | 482 | / | 470 | 1600 | 1574 | 1617 | 1608 | 1595 | 1643 | 1595 | 1620 | 1592 |
| 48.5 | 75.0 | 84.9 | 67.3 | 53.0 | 489 | / | 478 | 1626 | 1603 | 1643 | 1636 | 1622 | 1671 | 1623 | 1646 | 1623 |
| 49.0 | 75.3 | 85.2 | 67.7 | 53.6 | 497 | / | 486 | 1653 | 1633 | 1670 | 1665 | 1649 | 1699 | 1651 | 1674 | 1655 |
| 49.5 | 75.5 | 85.5 | 68.2 | 54.2 | 504 | / | 494 | 1681 | 1665 | 1697 | 1695 | 1677 | 1728 | 1679 | 1702 | 1689 |
| 50.0 | 75.8 | 85.7 | 68.6 | 54.7 | 512 | 502 | 502 | 1710 | 1698 | 1724 | 1724 | 1706 | 1758 | 1709 | 1731 | 1725 |
| 50.5 | 76.1 | 86.0 | 69.1 | 55.3 | 520 | 510 | 510 | / | 1732 | 1752 | 1755 | 1735 | 1788 | 1739 | 1761 | / |
| 51.0 | 76.3 | 86.3 | 69.5 | 55.9 | 527 | 518 | 518 | / | 1768 | 1780 | 1786 | 1764 | 1819 | 1770 | 1792 | / |
| 51.5 | 76.6 | 86.6 | 70.0 | 56.5 | 535 | 527 | 527 | / | 1806 | 1809 | 1818 | 1794 | 1850 | 1801 | 1824 | / |
| 52.0 | 76.9 | 86.8 | 70.4 | 57.1 | 544 | 535 | 535 | / | 1845 | 1839 | 1850 | 1825 | 1881 | 1834 | 1857 | / |
| 52.5 | 77.1 | 87.1 | 70.9 | 57.6 | 552 | 544 | 544 | / | / | 1869 | 1883 | 1856 | 1914 | 1867 | 1892 | / |
| 53.0 | 77.4 | 87.4 | 71.3 | 58.2 | 561 | 552 | 552 | / | / | 1899 | 1917 | 1888 | 1947 | 1901 | 1929 | / |
| 53.5 | 77.7 | 87.6 | 71.8 | 58.8 | 569 | 56l | 56l | / | / | 1930 | 1951 | / | / | 1936 | 1966 | / |
| 54.0 | 77.9 | 87.9 | 72.2 | 59.4 | 578 | 569 | 569 | / | / | 1961 | 1986 | / | / | 1971 | 2006 | / |
| 54.5 | 78.2 | 88.1 | 72.6 | 59.9 | 587 | 577 | 577 | / | / | 1993 | 2022 | / | / | 2008 | 2047 | / |
| 55.0 | 78.5 | 88.4 | 73.1 | 60.5 | 596 | 585 | 585 | / | / | 2026 | 2058 | / | / | 2045 | 2090 | / |
| 55.5 | 78.7 | 88.6 | 73.5 | 61.1 | 606 | 593 | 593 | / | / | / | / | / | / | / | 2135 | / |
| 56.0 | 79.0 | 88.9 | 73.9 | 61.7 | 615 | 601 | 601 | / | / | / | / | / | / | / | 2181 | / |
| 56.5 | 79.3 | 89.1 | 74.4 | 62.2 | 625 | 608 | 608 | / | / | / | / | / | / | / | 2230 | / |
| 57.0 | 79.5 | 89.4 | 74.8 | 62.8 | 635 | 616 | 616 | / | / | / | / | / | / | / | 2281 | / |
| 57.5 | 79.8 | 89,6 | 75.2 | 63.4 | 645 | 622 | 622 | / | / | / | / | / | / | / | 2334 | / |
| 58.0 | 80.1 | 89.8 | 75.6 | 63.9 | 655 | 628 | 628 | / | / | / | / | / | / | / | 2390 | / |
| 58.5 | 80.3 | 90.0 | 76.1 | 64.5 | 666 | 634 | 634 | / | / | / | / | / | / | / | 2448 | / |
| 59.0 | 80.6 | 90.2 | 76.5 | 65.1 | 676 | 639 | 639 | / | / | / | / | / | / | / | 2509 | / |
| 59.5 | 80.9 | 90.4 | 76.9 | 65.6 | 687 | 643 | 643 | / | / | / | / | / | / | / | 2572 | / |
| 60.0 | 81.2 | 90.6 | 77.3 | 66.2 | 698 | 647 | 647 | / | / | / | / | / | / | / | / | / |
| 60.5 | 81.4 | 90.8 | 77.7 | 66.8 | 710 | 650 | 650 | / | / | / | / | / | / | / | / | / |
| 61.0 | 81.7 | 91.0 | 78.1 | 67.3 | 72l | / | / | / | / | / | / | / | / | / | / | / |
| 61.5 | 82.0 | 91.2 | 78.6 | 67.9 | 733 | / | / | / | / | / | / | / | / | / | / | / |
| 62.0 | 82.2 | 91.4 | 79.0 | 68.4 | 745 | / | / | / | / | / | / | / | / | / | / | / |
| 62.5 | 82.5 | 91.5 | 79.4 | 69.0 | 757 | / | / | / | / | / | / | / | / | / | / | / |
| 63.0 | 82.8 | 91.7 | 79.8 | 69.5 | 770 | / | / | / | / | / | / | / | / | / | / | / |
| 63.5 | 83.1 | 91.8 | 80.2 | 70.1 | 782 | / | / | / | / | / | / | / | / | / | / | / |
| 64.0 | 83.3 | 91.9 | 80.6 | 70.6 | 795 | / | / | / | / | / | / | / | / | / | / | / |
| 64.5 | 83.6 | 92.1 | 81.0 | 71.2 | 809 | / | / | / | / | / | / | / | / | / | / | / |
| 65.0 | 83.9 | 92.2 | 81.3 | 71.1 | 822 | / | / | / | / | / | / | / | / | / | / | / |
| 65.5 | 84.1 | / | / | / | 836 | / | / | / | / | / | / | / | / | / | / | / |
| 66.0 | 84.4 | / | / | / | 850 | / | / | / | / | / | / | / | / | / | / | / |
| 66.5 | 84.7 | / | / | / | 865 | / | / | / | / | / | / | / | / | / | / | / |
| 67.0 | 85.0 | / | / | / | 879 | / | / | / | / | / | / | / | / | / | / | / |
| 67.5 | 85.2 | / | / | / | 894 | / | / | / | / | / | / | / | / | / | / | / |
| 68.0 | 85.5 | / | / | / | 909 | / | / | / | / | / | / | / | / | / | / | / |
The following data is mainly applicable to low-carbon steel (mild steel).
| Ferrous Metal Hardness | Tensile strength | ||||||
|---|---|---|---|---|---|---|---|
| Rockwell | Surface Rockwell | Vickers | Brinell HBS | ||||
| HRB | HR15T | HR30T | HR45T | HV | F/D2=10 | F/D2=10 | MPa |
| 60.0 | 80.4 | 56.1 | 30.4 | 105 | 102 | / | 375 |
| 60.5 | 80.5 | 56.4 | 30.9 | 105 | 102 | / | 377 |
| 61.0 | 80.7 | 56.7 | 31.4 | 106 | 103 | / | 379 |
| 61.5 | 80.8 | 57.1 | 31.9 | 107 | 103 | / | 381 |
| 62.0 | 80.9 | 57.4 | 32.4 | 108 | 104 | / | 382 |
| 62.5 | 81.1 | 57.7 | 32.9 | 108 | 104 | / | 384 |
| 63.0 | 81.2 | 58.0 | 33.5 | 109 | 105 | / | 386 |
| 63.5 | 81.4 | 58.3 | 34.0 | 110 | 105 | / | 388 |
| 64.0 | 81.5 | 58.7 | 34.5 | 110 | 106 | / | 390 |
| 64.5 | 81.6 | 59.0 | 35.0 | 11l | 106 | / | 393 |
| 65.0 | 81.8 | 59.3 | 35.5 | 112 | 107 | / | 395 |
| 65.5 | 81.9 | 59.6 | 36.1 | 113 | 107 | / | 397 |
| 66.0 | 82.1 | 59.9 | 36.6 | 114 | 108 | / | 399 |
| 66.5 | 82.2 | 60.3 | 37.1 | 115 | 108 | / | 402 |
| 67.0 | 82.3 | 60.6 | 37.6 | 115 | 109 | / | 404 |
| 67.5 | 82.5 | 60.9 | 38.1 | 116 | 110 | / | 407 |
| 68.0 | 82.6 | 61.2 | 38.6 | 117 | 110 | / | 409 |
| 68.5 | 82.7 | 61.5 | 39.2 | 118 | 111 | / | 412 |
| 69.0 | 82.9 | 61.9 | 39.7 | 119 | 112 | / | 415 |
| 69.5 | 83.0 | 62.2 | 40.2 | 120 | 112 | / | 418 |
| 70.0 | 83.2 | 62.5 | 40.7 | 12l | 113 | / | 42l |
| 70.5 | 83.3 | 62.8 | 41.2 | 122 | 114 | / | 424 |
| 71.0 | 83.4 | 63.1 | 41.7 | 123 | 115 | / | 427 |
| 71.5 | 83.6 | 63.5 | 42.3 | 124 | 115 | / | 430 |
| 72.0 | 83.7 | 63.8 | 42.8 | 125 | 116 | / | 433 |
| 72.5 | 83.9 | 64.1 | 43.3 | 126 | 117 | / | 437 |
| 73.0 | 84.0 | 64.4 | 43.8 | 128 | 118 | / | 440 |
| 73.5 | 84.1 | 64.7 | 44.3 | 129 | 119 | / | 444 |
| 74.0 | 84.3 | 65.1 | 44.8 | 130 | 120 | / | 447 |
| 74.5 | 84.4 | 65.4 | 45.4 | 13l | 12l | / | 451 |
| 75.0 | 84.5 | 65.7 | 45.9 | 132 | 122 | 152 | 455 |
| 75.5 | 84.7 | 66.0 | 46.4 | 134 | 123 | 155 | 459 |
| 76.0 | 84.8 | 66.3 | 46.9 | 135 | 124 | 156 | 463 |
| 76.5 | 85.0 | 66.6 | 47.4 | 136 | 125 | 158 | 467 |
| 77.0 | 85.1 | 67.0 | 47.9 | 138 | 126 | 159 | 471 |
| 77.5 | 85.2 | 67.3 | 48.5 | 139 | 127 | 16l | 475 |
| 78.0 | 85.4 | 67.6 | 49.0 | 140 | 128 | 163 | 480 |
| 78.5 | 85.5 | 67.9 | 49.5 | 142 | 129 | 164 | 484 |
| 79.0 | 85.7 | 68.2 | 50.0 | 143 | 130 | 166 | 489 |
| 79.5 | 85.8 | 68.6 | 50.5 | 145 | 132 | 168 | 493 |
| 80.0 | 85.9 | 68.9 | 51.0 | 146 | 133 | 170 | 498 |
| 80.5 | 86.1 | 69.2 | 51.6 | 148 | 134 | 172 | 503 |
| 81.0 | 86.2 | 69.5 | 52.1 | 149 | 136 | 174 | 508 |
| 81.5 | 86.3 | 69.8 | 52.6 | 151 | 137 | / | 513 |
| 82.0 | 86.5 | 70.2 | 53.1 | 152 | 138 | / | 518 |
| 82.5 | 86.6 | 70.5 | 53.6 | 154 | 140 | / | 523 |
| 83.0 | 86.8 | 70.8 | 54.1 | 156 | / | / | 529 |
| 83.5 | 86.9 | 71.1 | 54.7 | 157 | / | / | 534 |
| 84.0 | 87.0 | 71.4 | 55.2 | 159 | / | / | 540 |
| 84.5 | 87.2 | 71.8 | 55.7 | 16l | / | / | 546 |
| 85.0 | 87.3 | 72.1 | 56.2 | 163 | / | / | 551 |
| 85.5 | 87.5 | 72.4 | 56.7 | 165 | / | / | 557 |
| 86.0 | 87.6 | 72.7 | 57.2 | 166 | / | / | 563 |
| 86.5 | 87.7 | 73.0 | 57.8 | 168 | / | / | 570 |
| 87.0 | 87.9 | 73.4 | 58.3 | 170 | / | / | 576 |
| 87.5 | 88.0 | 73.7 | 58.8 | 172 | / | / | 582 |
| 88.0 | 88.1 | 74.0 | 59.3 | 174 | / | / | 589 |
| 88.5 | 88.3 | 74.3 | 59.8 | 176 | / | / | 596 |
| 89.0 | 88.4 | 74.6 | 60.3 | 178 | / | / | 603 |
| 89.5 | 88.6 | 75.0 | 60.9 | 180 | / | / | 609 |
| 90.0 | 88.7 | 75.3 | 61.4 | 183 | / | 176 | 617 |
| 90.5 | 88.8 | 75.6 | 61.9 | 185 | / | 178 | 624 |
| 91.0 | 89.0 | 75.9 | 62.4 | 187 | / | 180 | 63l |
| 91.5 | 89.1 | 76.2 | 62.9 | 189 | / | 182 | 639 |
| 92.0 | 89.3 | 76.6 | 63.4 | 191 | / | 184 | 646 |
| 92.5 | 89.4 | 76.9 | 64.0 | 194 | / | 187 | 654 |
| 93.0 | 89.5 | 77.2 | 64.5 | 196 | / | 189 | 662 |
| 93.5 | 89.7 | 77.5 | 65.0 | 199 | / | 192 | 670 |
| 94.0 | 89.8 | 77.8 | 65.5 | 201 | / | 195 | 678 |
| 94.5 | 89.9 | 78.2 | 66.0 | 203 | / | 197 | 686 |
| 95.5 | 90.1 | 78.5 | 66.5 | 206 | / | 200 | 695 |
| 95.0 | 90.2 | 78.8 | 67.1 | 208 | / | 203 | 703 |
| 96.0 | 90.4 | 79.1 | 67.6 | 211 | / | 206 | 712 |
| 96.5 | 90.5 | 79.4 | 68.1 | 214 | / | 209 | 721 |
| 97.0 | 90.6 | 79.8 | 68.6 | 216 | / | 212 | 730 |
| 97.5 | 90.8 | 80.1 | 69.1 | 219 | / | 215 | 739 |
| 98.0 | 90.9 | 80.4 | 69.6 | 222 | / | 218 | 749 |
| 98.5 | 91.1 | 80.7 | 70.2 | 225 | / | 222 | 758 |
| 99.0 | 91.2 | 81.0 | 70.7 | 227 | / | 226 | 768 |
| 99.5 | 91.3 | 81.4 | 71.2 | 230 | / | 229 | 778 |
| 100.0 | 91.5 | 81.7 | 71.7 | 233 | / | 232 | 788 |
Related reading: Metal Hardness Comparison Chart: HV, HB, HRC
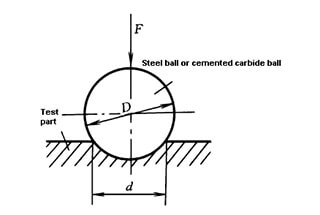
The Brinell hardness test uses a ball made of hardened steel or a hard alloy with a diameter of D as the indenter.
A specified test force F is applied to the surface of the material being tested, and after a designated hold time, the test force is removed, leaving an indentation with a diameter of d.
The Brinell hardness value is calculated by dividing the test force by the surface area of the indentation. The symbol for the Brinell hardness value is represented as HBS or HBW.
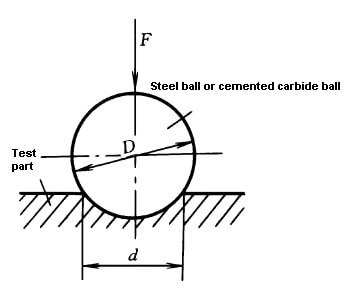
The difference between HBS and HBW lies in the type of indenter used.
HBS indicates the use of a hardened steel ball as the indenter and is used to determine the Brinell hardness of materials with a value less than 450, such as mild steel, gray cast iron, and non-ferrous metals.
HBW, on the other hand, refers to the use of a hard alloy ball as the indenter and is used to measure the Brinell hardness of materials with a value below 650.
Even when the same material and experimental conditions are used, the results of the two tests may vary, with the HBW value typically being higher than the HBS value, and there is no exact quantitative rule to follow.

In 2003, China adopted international standards and discontinued the use of steel ball indenters in favor of hard alloy ball heads.
As a result, HBS was no longer used and all Brinell hardness values are now represented by HBW.
Although HBW is often simply referred to as HB, references to HBS may still be found in literature.
The Brinell hardness measurement method is suitable for testing materials such as cast iron, non-ferrous alloys, and various steels that have undergone annealing or quenching and tempering processes.
However, it is not suitable for testing samples or workpieces that are too hard, too small, too thin, or do not allow for large indentations on the surface.
The Vickers hardness test uses either a diamond cone with a 120-degree cone apex angle or a hardened steel ball with a diameter of Ø1.588mm or Ø3.176mm as the indenter, along with a specified load.
The sample is subjected to an initial load of 10kgf and a total load of 60, 100, or 150kgf.
After the total load is applied, the hardness is determined by the difference in indentation depth when the main load is removed while retaining the initial load and the indentation depth under the initial load.
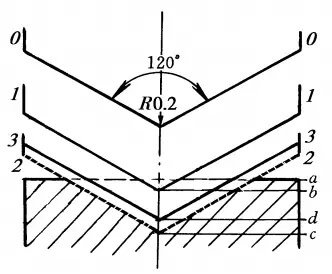
The Rockwell hardness test uses three different test forces and three different indenters, resulting in a total of nine possible combinations and corresponding Rockwell hardness scales.
These nine scales are suitable for a wide range of commonly used metal materials.
The three most commonly used Rockwell hardness scales are HRA, HRB, and HRC, with HRC being the most widely utilized.
Table of commonly used Rockwell hardness test specifications
| Hardness symbol | Indenter type | Total test force F/N(kgf) | Hardness range | Applications |
|---|---|---|---|---|
| HRA | 120°diamond cone | 588.4(60) | 20~88 | Hard alloy, carbide, shallow case hardening steel and etc. |
| HRB | Ø1.588mm Quenched steel ball | 980.7(100) | 20~100 | Annealed or normalized steel, aluminum alloy, copper alloy, cast iron |
| HRC | 120°diamond cone | 1471(150) | 20~70 | Hardened steel, quenched and tempered steel, deep case hardening steel |
The Rockwell hardness test is appropriate for hardness values ranging from 20-70HRC. If the hardness of the sample is less than 20HRC, it is recommended to use the HRB scale as the sensitivity of the indenter decreases with increased pressure on the conical part.
However, if the hardness of the sample is greater than 67HRC, it is advised to use the HRA scale as the pressure on the tip of the indenter may become too high and result in damage to the diamond and reduced life of the indenter.
The Rockwell hardness test is known for its ease, speed, and minimal indentation, making it ideal for testing the surface of finished products and harder, thinner workpieces.
However, due to the small indentation, the hardness value may fluctuate greatly for materials with uneven structures and hardness, making it less accurate than the Brinell hardness test.
The Rockwell hardness test is commonly used to determine the hardness of materials such as steel, non-ferrous metals, and cemented carbides.
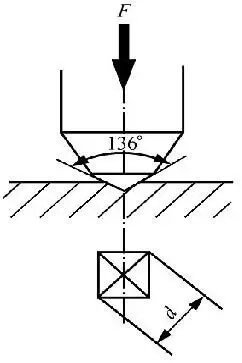
The principle behind the Vickers hardness measurement is similar to that of the Brinell hardness test.
A diamond pyramid-shaped indenter with an angle of 136° is used to apply a specified test force, F, onto the surface of the material being tested.
After a specified holding time, the test force is removed, and the hardness value is calculated as the average pressure on the unit surface area of the regular pyramid-shaped indentation, with the symbol HV.

The Vickers hardness measurement has a wide range, and it can measure materials with a hardness ranging from 10 to 1000 HV. The indentation is small in size.
This measurement method is commonly used to measure thin materials and surface-hardened layers created through carburizing and nitriding.
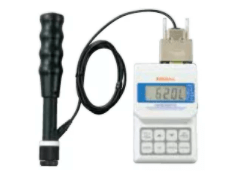
The Leeb Hardness Test uses a device equipped with a tungsten carbide ball to impact the surface of the test piece, which then rebounds. The speed of the rebound is affected by the hardness of the material being tested.
A permanent magnetic material is installed on the impact device, which produces an electromagnetic signal proportional to the speed of the impact body’s movement. This signal is then converted into a Leeb hardness value by an electronic circuit, represented by the symbol HL.
The Leeb Hardness Tester is a handheld device that does not require a workbench. Its hardness sensor is compact and can be easily operated by hand, making it suitable for testing large, heavy, or complex geometries.
One of the key benefits of the Leeb Hardness Test is that it results in only light surface damage, making it an ideal option for non-destructive testing. It also provides a unique hardness test for all directions, narrow spaces, and special parts.
The Rockwell Hardness Test is commonly used to measure the hardness of metals. This test evaluates the depth of penetration of an indenter under a large load compared to the penetration made by a preload.
Equipment and Procedure
Equipment Needed:
Rockwell hardness testing machine.
Indenters: Diamond cone (for harder materials) or steel ball (for softer materials).
Specimen: Prepared sample of the material to be tested.
Procedure:
Prepare the Specimen: Ensure the specimen surface is clean and smooth to avoid affecting test results.
Select the Appropriate Scale: Choose the Rockwell scale based on the material’s hardness, such as HRC for hard materials and HRB for softer materials.
Position the Specimen: Place the specimen securely on the anvil of the testing machine.
Apply the Minor Load: Apply a 10 kgf minor load to seat the indenter and penetrate surface oxidation.
Apply the Major Load: Increase the load to the specified major load for the chosen Rockwell scale, such as 150 kgf for HRC.
Measure the Indentation: After applying the major load, the machine measures the indentation depth and automatically calculates the Rockwell hardness number.
The Brinell Hardness Test measures the hardness of large and coarse-grained materials by evaluating the diameter of an indentation made by a spherical indenter.
Equipment and Procedure
Equipment Needed:
Brinell hardness testing machine.
Spherical indenter (typically 10 mm in diameter, made of hardened steel or tungsten carbide).
Specimen: Properly prepared sample of the material to be tested.
Procedure:
Prepare the Specimen: Make sure the specimen surface is flat and clean.
Position the Specimen: Place the specimen securely on the anvil of the testing machine.
Select the Load: Select a load between 500 kgf and 3000 kgf, depending on the material.
Apply the Load: Apply the selected load for 10 to 30 seconds, then measure the indentation diameter using a microscope.
Calculate the Hardness: Use the diameter of the indentation to calculate the Brinell Hardness Number (BHN) using the formula: [ \text{BHN} = \frac{2P}{\pi D (D – \sqrt{D^2 – d^2})} ] where (P) is the load, (D) is the diameter of the indenter, and (d) is the diameter of the indentation.
The Vickers Hardness Test is a versatile method for measuring the hardness of materials, including metals and ceramics, by using a diamond pyramid indenter.
Equipment and Procedure
Calculate the Hardness: Calculate the Vickers Hardness Number (VHN) using the diagonal measurements and the formula:
where (P) is the load and (d) is the average length of the diagonals of the indentation.
Equipment Needed:
Vickers hardness testing machine.
Diamond pyramid indenter with a square base.
Specimen: Properly prepared sample of the material to be tested.
Procedure:
Prepare the Specimen: Ensure the specimen surface is smooth and clean.
Position the Specimen: Place the specimen securely on the anvil of the testing machine.
Select the Load: Select a load between 1 gf and 120 kgf, depending on the material and precision needed.
Apply the Load: Apply the load for 10 to 15 seconds, then measure the indentation diagonals with a microscope.
The Brinell hardness test measures the hardness of a sample by pressing a steel ball or diamond cone into the sample’s surface and measuring the depth of the indentation. This method is suitable for determining the hardness of materials such as annealed, normalized, quenched and tempered steel, cast iron, and non-ferrous metals.
The Rockwell hardness test uses specific procedures and smaller indenters, such as diamonds, to measure hardness, making it suitable for a wide range of materials.
The Vickers hardness test retains the advantages of both the Brinell and Rockwell tests, capable of measuring materials ranging from extremely soft to extremely hard, and their results can be compared.
The specifics of the advantages and disadvantages of the Knoop hardness test are not detailed in the information I found, but it is one of the static test methods, on par with Brinell, Rockwell, and Vickers.
The Webster hardness tester is primarily used to check the mechanical properties of aluminum alloy profiles, but it’s also suitable for materials like copper, brass, and mild steel.
The Barcol hardness tester is a type of indentation hardness tester. The specifics of its advantages and disadvantages are not explicitly stated in the information I found.
Each hardness testing method has its characteristics and range of applications:
Each hardness testing method has unique features suitable for specific applications.
Load Ranges and Indentation Types
Standards and References
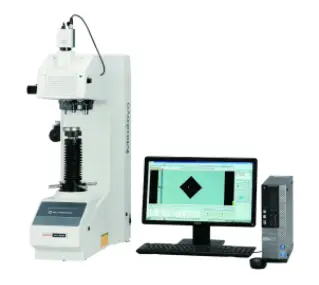
HM series:


Below are answers to some frequently asked questions:
The Mohs Hardness Scale is used to measure the scratch resistance of minerals. Developed by Friedrich Mohs in 1812, it is a qualitative ordinal scale that helps identify and classify minerals based on their ability to scratch one another. While primarily used in geology and mineralogy, the Mohs scale also has applications in material science for assessing the relative durability and abrasion resistance of various materials. However, for precise measurements of metal hardness, more quantitative tests such as the Vickers, Rockwell, or Brinell hardness tests are preferred.
The Rockwell Hardness Test measures the hardness of materials by determining the depth of penetration of an indenter under a large load compared to the penetration made by a preliminary load. The test begins with applying a minor load (typically 10 kgf), establishing a baseline depth. Then, a major load is applied, which can vary depending on the specific Rockwell scale being used. After holding this load for a specific duration, it is removed, leaving the minor load in place. The hardness value is calculated based on the difference in depth measurements before and after applying the major load. This test is advantageous for its simplicity, quick results, minimal material damage, and direct hardness readings. It is widely used in quality control and material selection in various industries.
The Brinell and Vickers hardness tests differ primarily in their indenters, procedures, and material applicability. The Brinell test uses a steel or tungsten carbide ball indenter, typically ranging from 1 to 10 mm in diameter, and is slower due to the high load application, making it suitable for materials with coarse or inhomogeneous surfaces but less accurate for very hard materials. In contrast, the Vickers test employs a diamond pyramid indenter with a 136-degree opening angle, providing higher accuracy and reliability, and is faster, requiring a well-prepared surface. The Vickers test is versatile, suitable for a wide range of materials, including thin sheets and hardened steels, while the Brinell test is better for rough surfaces and certain metals but limited by potential indenter deformation and larger indentation sizes.
Improving metal hardness through heat treatment involves several processes designed to alter the metal’s microstructure and enhance its mechanical properties. The key methods include:
By applying these heat treatment processes, the hardness and other mechanical properties of metals can be optimized for various industrial applications.
Metal hardness is crucial in industrial applications because it directly impacts the performance, durability, and suitability of materials for various uses. Harder metals offer better resistance to wear, abrasion, and deformation, which is essential in environments where components are subjected to heavy loads, friction, and impact. This ensures the longevity and structural integrity of machinery and structures. Additionally, hardness testing aids in material selection and quality control, verifying that materials meet specific standards and specifications. This is particularly important for maintaining consistency and reliability in manufacturing processes. Overall, metal hardness is a fundamental property that influences the effectiveness and lifespan of industrial products.
