Have you ever wondered about the hardness of materials around you? From the softness of talc to the unmatched hardness of diamonds, the Mohs scale offers a fascinating journey through the world of minerals. In this article, we’ll dive into the intricacies of this essential tool, exploring its history, application, and the captivating stories behind the minerals that define it. Get ready to uncover the secrets of the Mohs scale and gain a newfound appreciation for the materials that shape our world.
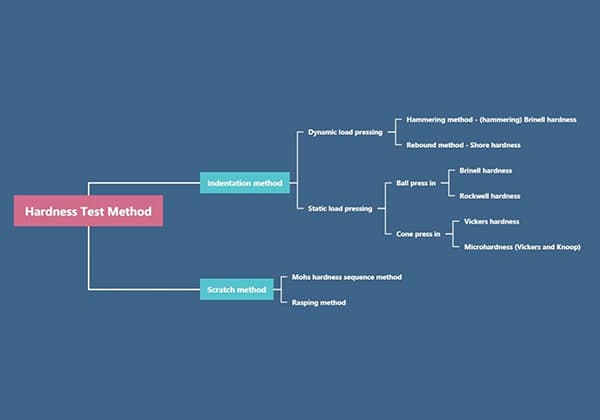
Hardness is a critical material property that measures a material’s resistance to deformation, particularly permanent indentation, scratching, cutting, or abrasion. It is essential in various fields, including manufacturing, metallurgy, and engineering, to ensure materials meet specific performance criteria. Hardness tests provide valuable data for material selection, quality control, and predicting wear resistance.
The Brinell hardness test involves forcing a hard steel or carbide sphere into the surface of a material under a specified load. The hardness is determined by measuring the diameter of the resulting indentation and calculating the Brinell Hardness Number (BHN). For example, a typical application is testing cast iron, which may yield a BHN of around 150 to 200. This method is particularly useful for materials with coarse or nonuniform grain structures because it averages the hardness over a larger area.
The Rockwell hardness test measures hardness by determining the net increase in depth of an impression as a load is applied. It uses a minor load to seat the indenter and then a major load to create the indentation. The difference in depth between the minor and major loads provides the Rockwell hardness number. Different scales (A, B, C, etc.) are used depending on the type of indenter and the test load. For instance, the Rockwell C scale, which uses a 120-degree diamond cone with up to a 150 kg load, is commonly used for industrial machine knives, typically ranging from RC 40 to RC 65.
The Vickers hardness test uses a diamond pyramid indenter to create a square indentation on the material’s surface. The diagonal of the indentation is measured optically, and the Vickers Hardness Number (VHN) is calculated. This method can be applied to both soft and hard materials and is suitable for micro-hardness testing. For example, testing a piece of hardened steel might yield a VHN of around 600.
The Rockwell hardness scale is widely used and recognized, especially in the steel industry. It includes various scales such as A, B, C, etc., each suitable for different materials. The Rockwell C scale is particularly common for industrial machine knives and ranges from RC 40 to RC 65. For example, a high-carbon steel knife blade might have a hardness of around RC 58.
The Brinell hardness number (HB) is calculated based on the load and the surface area of the indentation. It is expressed in a format like “75 HB 10/500/30,” indicating the hardness, ball diameter, load, and duration of the test. This scale is often used for testing non-ferrous metals and cast iron.
The Vickers hardness number (VHN) is calculated from the diagonal measurement of the square indentation. This scale is continuous and can be used across a wide range of materials. For instance, a piece of aluminum alloy might have a VHN of 120.
Recent advancements in hardness testing include automated hardness testing machines and non-destructive testing methods. These technologies enhance the accuracy and efficiency of hardness measurements, making it easier to test complex shapes and materials in real-time. For example, portable hardness testers now allow for on-site testing, providing immediate results without the need for laboratory conditions.
There are two methods to measure the hardness of materials: scratch hardness and static load indentation hardness. Scratch hardness, also known as Mohs hardness, is a relative hardness and is rather rough.
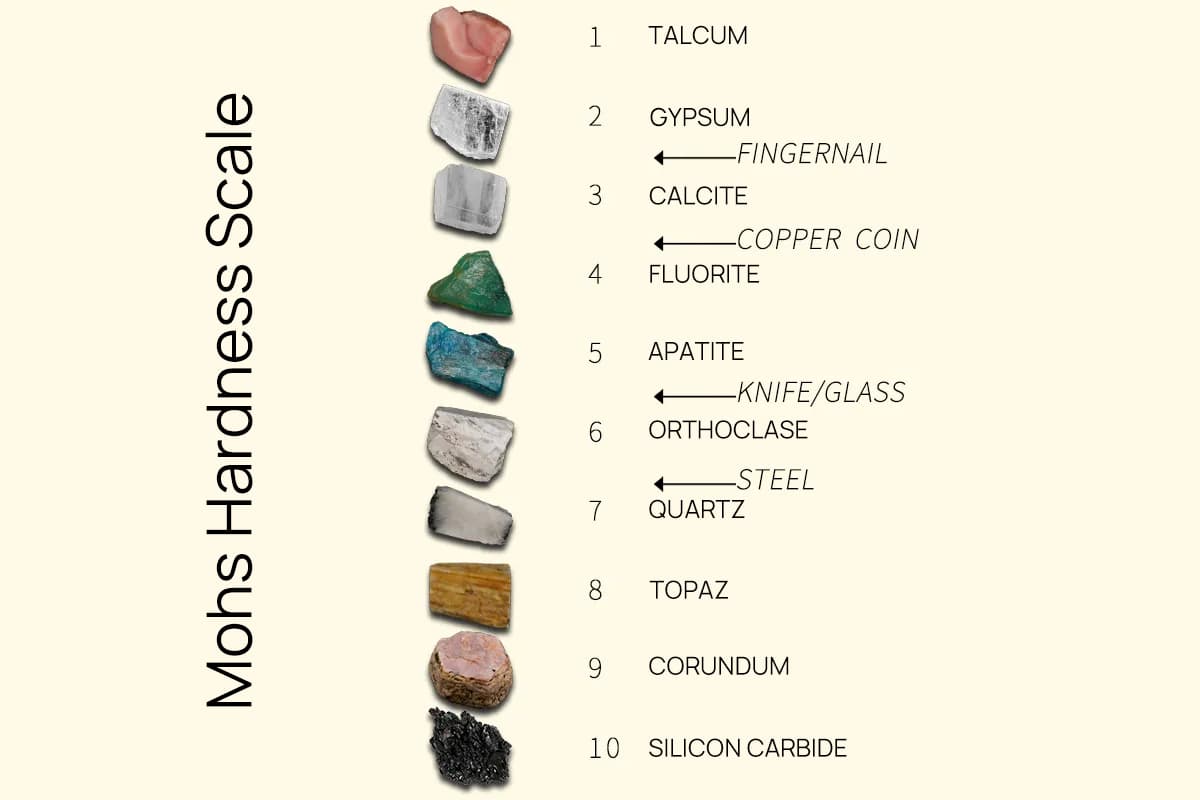
It uses ten natural minerals as standards. The hardness order does not represent the absolute size of a particular mineral’s hardness, but indicates that a mineral of higher hardness order can scratch a mineral of lower order. The hardness of other minerals is determined by comparison with these standard minerals.

The unit of Mohs hardness is kilogram-force per square centimeter (kgf/cm²), denoted as [Pa]. It’s a standard for expressing a mineral’s hardness, first proposed in 1824 by German mineralogist Frederich Mohs. The hardness is represented by the depth of the scratch made on the surface of the tested mineral using the scratch method with a pyramid-shaped diamond needle.
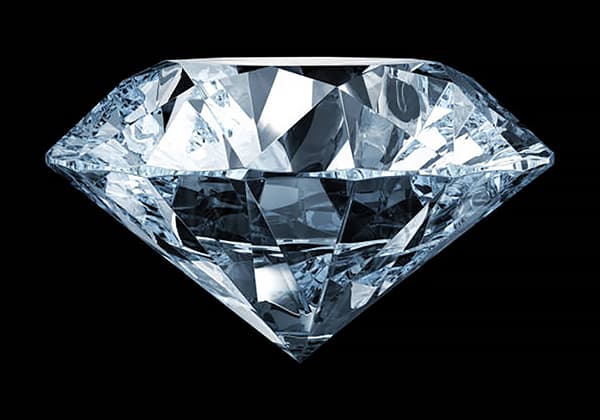
The hardness scale is as follows: talc 1 (softest), gypsum 2, calcite 3, fluorite 4, apatite 5, orthoclase (also known as feldspar or periclase) 6, quartz 7, topaz 8, corundum 9, diamond 10 (hardest). Mohs hardness is also used to express the hardness of other solid materials.
| Level | Minerals | Equivalent to |
| 1 | Talc | None |
| 2 | Gypsum | Fingernail |
| 3 | Calcite | Copper Coin |
| 4 | Fluorite | Iron Nail |
| 5 | Apatite | Glass |
| 6 | Orthoclase | Penknife |
| 7 | Quartz | File |
| 8 | Topaz | Sandpaper |
| 9 | Corundum | None |
| 10 | Diamond | None |
For a more specific method: one would scratch the mineral to be tested against the standard hardness on the Mohs hardness scale to determine the hardness of the tested mineral.
For example, if a mineral can scratch calcite and be scratched by fluorite, then the hardness of that mineral is between 3 and 4. Alternatively, one can use a fingernail (hardness 2-2.5), a coin (hardness 3.5), or a small knife (hardness 5.5) to scratch the mineral in order to broadly determine its hardness.
| Representative Mineral Names | Common Uses | Hardness Scale |
| Talc, Graphite | Talc is the softest known mineral, commonly used in the form of talc powder. | 1 |
| Skin, Natural Arsenic | 1.5 | |
| Gypsum | Industrial Materials | 2 |
| Ice Cube | 2~3 | |
| Nails, Amber, Ivory | 2.5 | |
| Gold, Silver, Aluminum | 2.5~3 | |
| Calcite, Copper, Pearls | Calcite can be used as carving material and industrial raw material. | 3 |
| Shells, Coins | 3.5 | |
| Fluorite (also known as Fluorspar) | Carving, Metallurgy, Building Materials | 4 |
| Platinum | Rare Metals | 4~4.5 |
| Iron | 4~5 | |
| Phosphorite | Phosphorus is an important component of biological cells; it is used as raw material in feed, fertilizer, and chemical production. | 5 |
| Glass, Stainless Steel | 5.5 | |
| Orthoclase, Tanzanite, Pure Titanium | 6 | |
| Teeth (outer layer of crown) | The main component is hydroxyapatite. | 6~7 |
| Soft Jade – Xinjiang Hetian Jade | 6~6.5 | |
| Pyrite | It is used as raw material for the production of sulfuric acid; gold refining; and can also be used in medicinal purposes. | 6.5 |
| Hard Jade – Burmese Jadeite and Jade | 6.5~7 | |
| Quartz Glass, Amethyst | 7 | |
| Electric Stone, Zircon | 7.5 | |
| Quartz | According to the old hardness scale, quartz is rated as 7. | 8 |
| Peridot | 8.5 | |
| Topaz, Chromium, Tungsten Steel | On the old hardness scale, topaz is rated as 8. | 9 |
| Moissanite | Synthetic gems are 2.5 times brighter than diamonds and cost 1/10th of the price. | 9.5 |
| Garnet | 10 | |
| Melted Zirconia | 11 | |
| Corundum | Corundum is rated as 9 on the old hardness scale. Natural gems such as rubies and sapphires are now considered types of corundum, as is the hardness of synthetic sapphire crystals. | 12 |
| Silicon Carbide | 13 | |
| Boron Carbide | 14 | |
| Diamond | Diamonds are rated as 10 on the old hardness scale, making them the hardest natural gem on earth. | 15 |
Mohs Hardness is a standard that indicates the hardness of minerals, first proposed in 1824 by German mineralogist Friedrich Mohs. This standard is established by using a pyramid-shaped diamond drill to scratch the surface of a mineral, with the depth of the scratch indicating the hardness.
The hardness of a mineral refers to its ability to resist certain external mechanical forces such as scratching, indentation, or grinding. In mineralogy, the hardness often referred to is Mohs hardness, which is the scratch hardness compared to the Mohs hardness scale.
The Mohs hardness scale is based on ten minerals of different hardness, divided into ten levels from low to high: 1. Talc; 2. Gypsum; 3. Calcite; 4. Fluorite; 5. Apatite; 6. Orthoclase; 7. Quartz; 8. Topaz; 9. Corundum; 10. Diamond.
In use, standard minerals are scratched against minerals of unknown hardness. If the mineral can be scratched by apatite but not by fluorite, its hardness is determined to be between 4 and 5.
This method was established and named by German mineralogy professor Friedrich Mohs (1773-1839). However, accurate measurement of mineral hardness still requires a microhardness tester or hardness tester. Mineral hardness is also one of the physical properties of minerals. Minerals with high hardness have been widely used in industrial technology.
Diamonds, corundum, and other minerals are not only used in industry, but also become precious gemstones. As gemstones, they usually have a high hardness.
For example, the hardness of opal is 5.5-6.5, quartz is 6.5-7, sphalerite is 7.5-8. Tsavorite is 8.5, and the hardness of sapphires and rubies is 9, second only to diamonds. People choose high-hardness minerals as gemstones, probably because they are wear-resistant, symbolizing their timeless value!
According to needs, people have also developed a gem hardness scale to identify the mineral hardness of gemstones, from the softest to the hardest minerals: talc, gypsum, calcite, fluorite, apatite, zircon, corundum, silicon carbide, boron carbide, diamond, etc.
When there is no standard hardness mineral, the simplest way to measure hardness is with a fingernail or a small knife. The hardness of a fingernail is 2.5, a copper coin is 3, and glass and a small knife are both 5. Those above 6 are almost all gemstone-like minerals.
The intrinsic properties of the material being tested can significantly impact the accuracy of hardness conversions. For instance, in steel alloys, variations in grain structure due to heat treatment can lead to different hardness measurements. A fine-grained structure may yield higher hardness values compared to a coarse-grained structure. These differences necessitate the use of material-specific conversion tables, such as those provided in ASTM E140 or ISO 18265, to ensure accurate conversions.
The accuracy of hardness conversion depends heavily on the testing methodology used. Different hardness tests use various indenters and loads, which can lead to discrepancies. For example, the Rockwell hardness test uses a diamond cone or steel ball indenter to measure indentation depth, while the Leeb hardness test measures rebound velocity using a tungsten carbide ball. Because these tests operate on different principles, careful consideration and sometimes intermediate conversions (e.g., HLD to HV to HRC) are needed for accurate results.
Proper calibration of hardness testing equipment is essential for accurate conversions. Miscalibrated devices can produce erroneous hardness values, leading to inaccurate conversions. Regular calibration against standard reference materials, as specified in guidelines like ASTM E140, ensures the reliability of the measurements. For example, calibrating a Leeb hardness tester with a certified reference block with a known hardness value can help maintain accuracy.
The condition of the material’s surface can affect hardness test results and, consequently, the accuracy of conversions. A rough or contaminated surface can lead to inaccurate hardness readings. Proper surface preparation, such as polishing and cleaning, is vital to obtain consistent and reliable measurements. For instance, a polished and clean surface will yield more accurate Rockwell hardness values compared to a rough, unprepared surface.
The skill and experience of the operator conducting the hardness test can influence the accuracy of the results. Inconsistent application of the test procedure, such as improper indenter placement or incorrect load application, can lead to variable hardness readings. Training and adherence to standardized testing protocols are essential to minimize operator-induced errors.
Environmental conditions, such as temperature and humidity, can impact hardness measurements. Extreme temperatures can alter the material properties, affecting hardness readings. Testing should be conducted under controlled environmental conditions to ensure accuracy. For example, testing at room temperature (approximately 20-25°C) is ideal for most hardness tests.
The quality of the empirical data used to develop conversion tables directly affects the accuracy of hardness conversions. Conversion tables based on extensive and well-documented empirical data provide more reliable results. It is essential to refer to recognized standards and industry-validated conversion tables, such as those from ASTM E140 or ISO 18265, to ensure accuracy.
Consistent use of measurement units across different hardness scales is crucial for accurate conversions. Discrepancies in units, such as using kilograms force (kgf) versus Newtons (N) for load measurements, can lead to errors. Always ensure that the units are consistent and correctly applied throughout the conversion process.
When using intermediate scales for conversion, the accuracy of each step must be considered. Converting from HLD to HV and then from HV to HRC involves multiple steps, each with its own potential for error. Ensuring high accuracy at each intermediate step improves the overall conversion accuracy.
Verifying hardness conversion results using multiple sources or methods enhances accuracy. Cross-referencing results with different conversion tables or performing additional hardness tests using alternative methods can validate the initial conversion. For example, verifying an HLD to HRC conversion by also conducting a Vickers hardness test and comparing the results adds an extra layer of confidence.
By understanding and accounting for these factors, you can improve the accuracy of hardness conversions, ensuring reliable and consistent material property assessments.
Below are answers to some frequently asked questions:
Converting Leeb Hardness (HL) to Rockwell C Hardness (HRC) accurately requires understanding the differences between these hardness scales and using appropriate conversion methods.
Leeb Hardness (HL) is determined by a rebound test where a tungsten carbide ball indenter impacts the surface, and the hardness is calculated based on the ratio of the rebound velocity to the impact velocity. In contrast, Rockwell C Hardness (HRC) is measured using a diamond indenter under a specified load, with hardness calculated from the depth of the indentation.
To convert HL to HRC accurately, you should use pre-established conversion tables specific to the material being tested. These tables are based on extensive empirical data and account for the differences in testing methods.
For example, if you have an HL value of 50 and need to convert it to HRC, you would reference a conversion table. If the table shows that 49 HL corresponds to 112 HRC and 51 HL corresponds to 113 HRC, you would interpolate between these values. Generally, for a conservative estimate, you might use the lower value, so 50 HL would correspond to approximately 112 HRC.
It’s important to note that the accuracy of this conversion depends on the material’s properties. Different materials require separate conversion tables because hardness is influenced by a combination of factors, not just a single fundamental property. Additionally, the precision of the input values is crucial for accurate results, as the modulus of elasticity and indentation depth play significant roles.
To simplify the process, hardness conversion calculators can be used, but these tools also rely on the same underlying conversion tables and may provide approximate values. Therefore, using specific and precise conversion tables is the best method for achieving accurate results when converting HL to HRC.
Conversion tables for hardness values are essential due to the inherent differences in hardness testing methods, the practical challenges of testing various materials, and the need for standardized communication across industries. Different hardness tests, such as Vickers, Knoop, and Rockwell, use distinct indenters and loads, resulting in varying hardness measurements for the same material. Conversion tables standardize these values, ensuring consistency and compatibility.
In practice, certain materials might not be suitable for specific testing methods due to their size, thickness, or fragility. For example, small or delicate samples might require Vickers or Knoop testing instead of Rockwell. Conversion tables allow for the translation of hardness values between these different scales, making it possible to evaluate materials that cannot be tested under the specified conditions.
However, it is important to recognize that hardness conversions are approximate and based on empirical data. Factors such as alloy composition, grain structure, and heat treatment can influence hardness measurements, making precise conversions challenging. Standards like ASTM E140 provide guidelines for these conversions, but they emphasize caution and the need to interpret converted values within the context of the material’s properties and treatment history.
Ultimately, conversion tables play a crucial role in quality control and decision-making processes. They provide a framework for comparing hardness values across different testing methods, which can impact the acceptance or rejection of materials. However, these tables should be used judiciously, acknowledging their limitations and the approximate nature of the conversions they offer.
Converting hardness values from Leeb Hardness (HLD) to Rockwell Hardness (HRC) is fraught with several challenges. One of the primary difficulties is the absence of a direct mathematical formula for conversion. Instead, the process relies on experimental data and the use of conversion tables or curves derived from multiple measurements. These conversion curves are approximations and inherently carry some level of uncertainty.
Material variability adds another layer of complexity. Even within the same material class, differences in microstructure, processing conditions, and minor variations in chemical composition can result in different hardness values. Consequently, a conversion curve valid for one specific material may not be accurate for another, even if both materials belong to the same general category.
User-dependent factors also play a significant role, particularly with portable hardness testing methods like the Leeb test. These methods, while convenient, require careful handling and calibration to minimize errors, introducing additional uncertainty.
Conversion tables and curves are often material-specific and may not be universally applicable. For example, a conversion table designed for steel may not be accurate for other metals or alloys. Additionally, the same material can show different hardness values under different testing conditions, further complicating the conversion process.
Given these challenges, it is generally recommended to use the native scale of the test method to avoid uncertainties associated with conversions. If feasible, adopting a single hardness scale across the entire production chain can simplify quality assurance processes and reduce errors.
In practical terms, when using conversion tables or curves, it is crucial to ensure that the material being tested closely matches the material for which the conversion was established. Simple one-point shift corrections are often insufficient for materials with a wide range of hardness values, necessitating the use of more accurate multipoint conversion curves.
In summary, converting HLD to HRC involves significant challenges due to the empirical nature of the conversions, material variability, and the potential for user-dependent errors. Awareness of these limitations is essential, and conversion tables and curves should be used judiciously.
Yes, the material type can significantly affect hardness conversion results. Different materials exhibit unique microstructures influenced by factors such as heat treatment, processing conditions, and chemical composition. Even within the same general material category, these variations can lead to differing hardness values. Hardness conversion curves, which are empirically determined for specific material groups, are not universally applicable and can introduce errors when used across different materials. This necessitates material-specific corrections to ensure accuracy.
Additionally, the surface finish and structural integrity of the material play crucial roles in hardness measurement. Factors like surface roughness, work-hardening gradients, and deformed metal near the surface can impact hardness readings. Standardized and appropriate sample preparation methods tailored to each material type are essential to mitigate these influences.
To minimize uncertainties, it is recommended to use the native scale of the test method rather than converting between scales. For example, sticking with the Rockwell scale when using a Rockwell test avoids the potential errors associated with conversion curves. In summary, material type is a critical factor in hardness conversion due to variations in microstructure, the empirical nature of conversion curves, and the need for material-specific corrections and standardized testing methods.
To find reliable HLD (Leeb Hardness) to HRC (Rockwell Hardness C scale) conversion tables, you can refer to several credible sources:
The Screening Eagle Technologies document provides a comprehensive hardness conversion chart that includes Leeb hardness scales (HLD) along with other hardness scales such as Brinell, Vickers, and Rockwell. This chart is particularly useful for converting HLD to HRC among other scales.
