Have you ever wondered how intricate metal designs in cars and airplanes come to life? This article explores the fascinating world of sheet metal bending and grooving techniques, revealing how these processes shape the complex, smooth, and precise metal parts we see every day. Get ready to uncover the secrets behind flawless bends and stunning metalwork!
Sheet metal fabrication is a critical component of mechanical processing, playing a pivotal role in industries such as aerospace, consumer appliances, automotive, and elevator manufacturing. The versatility and widespread application of sheet metal parts underscore their importance across these sectors.
Bending, a fundamental forming process in sheet metal fabrication, is crucial for achieving desired shapes and geometries. The quality of the bending operation directly impacts the dimensional accuracy, structural integrity, and aesthetic appeal of the final product. Consequently, precise control over forming dimensions and angles during bending has become a focal point of research and development in advanced manufacturing technologies.
As global economies advance and consumer expectations evolve, there is an increasing demand for sophisticated design elements in sheet metal products. Intricate and complex shapes in metal sheet decorations not only showcase the designer’s expertise and adherence to contemporary aesthetics but also serve as a key differentiator in attracting discerning customers.
Modern sheet metal fabrication must meet stringent technical requirements, including:
Traditional press brake machines, while effective for many applications, have limitations in meeting these exacting standards. This has led to the development and adoption of innovative techniques such as grooving bending technology in sheet metal fabrication. Grooving allows for more precise control over the bending process, especially for complex geometries and tight tolerances.
This article delves into the distinctive characteristics of grooving techniques, exploring various methods for implementing grooving in sheet metal fabrication. Furthermore, it examines strategies to ensure dimensional and angular accuracy during the bending process, addressing the challenges posed by increasingly demanding product specifications and quality standards in modern manufacturing.

Fig.1 Bend forming process
The traditional bending method in sheet metal fabrication utilizes the precise application of force between the upper punch and lower die of a press brake machine. This process induces controlled deformation in the sheet metal workpiece.
During the bending operation, the sheet metal is forced through the opening of the lower die by the descending upper punch. The material undergoes a complex stress-strain transformation, transitioning from initial elastic deformation to permanent plastic deformation as the applied force exceeds the material’s yield strength.
The final bending angle is primarily determined by the penetration depth of the upper punch into the lower die cavity. A critical consideration in this process is maintaining a minimum bending radius (R) that is equal to or greater than the sheet thickness (t), as illustrated in Figure 1. This relationship is crucial for preventing material failure and ensuring consistent part quality.
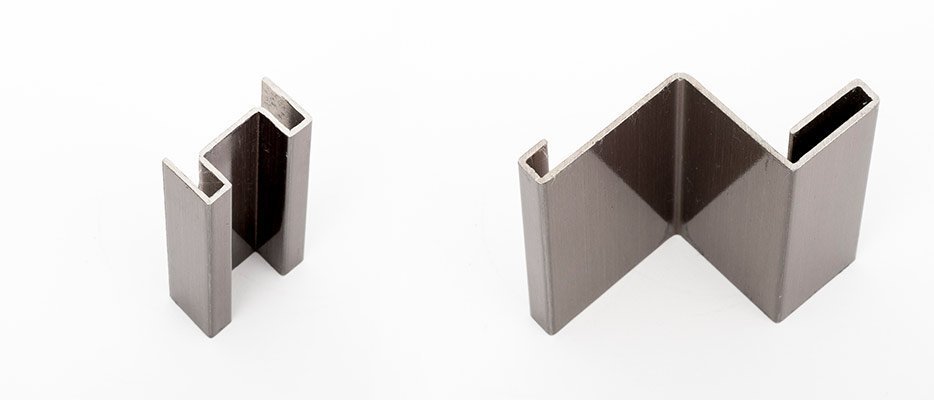
However, the evolving demands of modern manufacturing have pushed the boundaries of traditional bending techniques. Increasingly complex workpiece geometries, such as those depicted in Figure 2, present challenges that conventional bending methods struggle to address. One significant limitation is the difficulty in precisely controlling the bending radius, which is particularly problematic when non-indentation bending is required to meet stringent technical specifications.
These limitations have driven the development of advanced bending techniques, among which groove bending has emerged as a promising solution. This innovative approach offers enhanced control over the bending process, enabling the fabrication of complex shapes with greater precision and repeatability.

Fig.2 Sheet metal parts with a complex shape
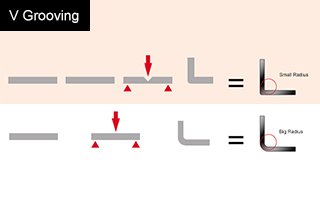
Groove bending is a sophisticated metal forming technique that utilizes a grooving machine to create a precise V-shaped slot along the intended bend line of a sheet metal workpiece. This grooved sheet is then bent on a press brake to achieve specific geometric requirements.
The key characteristics of the groove bending process include:
1. Minimal Bend Radius and Absence of Surface Deformation
In conventional bending, the minimum achievable bend radius is directly proportional to the material thickness. Thicker sheets inherently result in larger bend radii. However, groove bending significantly alters this relationship:
These attributes make groove bending ideal for high-end architectural and design applications in luxury hotels, financial institutions, commercial complexes, and modern airports, where stringent aesthetic requirements demand sharp corners, seamless surfaces, and no visible bending artifacts.
2. Reduced Press Brake Tonnage Requirements
The force required to bend sheet metal is primarily a function of material thickness, yield strength, and bend angle. Groove bending offers significant advantages in this aspect:
3. Enhanced Formability for Complex Geometries
Groove bending expands the realm of possible part geometries:
4. Precise Springback Control
Springback, the elastic recovery of material after bending, is a significant challenge in sheet metal forming. Groove bending offers unique advantages in managing this phenomenon:
In conclusion, groove bending represents a highly specialized metal forming technique that offers superior control over bend geometry, surface quality, and material behavior. Its application can significantly enhance manufacturing capabilities, particularly for high-precision, aesthetically critical components in industries ranging from architectural metalwork to advanced aerospace applications.
In sheet metal production, the gantry planer and metal sheet grooving machine are commonly used for creating V-shaped slots in the metal sheet.
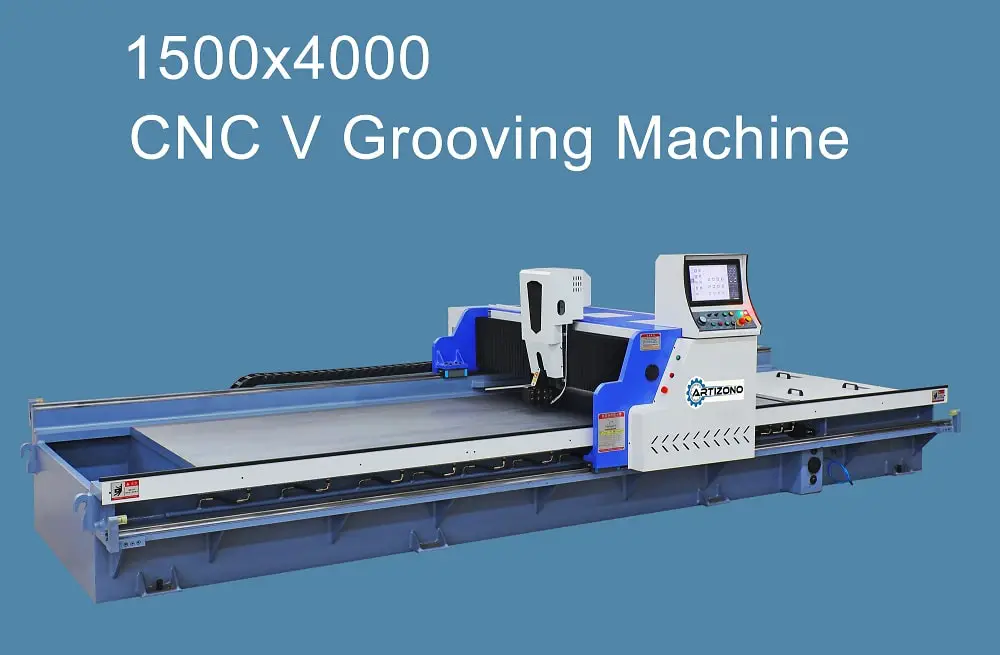
Position the bent plate in the grooving machine for alignment and input the plate thickness for automatic grooving.
During the grooving process, attention should be given to the following two aspects.
The relationship between groove depth and remaining thickness is critical in plate processing, particularly for bending applications. This correlation is determined by the initial plate thickness and the desired final characteristics.
In accordance with industry-standard bending techniques, a minimum residual thickness is established to maintain structural integrity. This value is typically set at 0.8mm by default, with an absolute minimum of 0.3mm to ensure material stability and prevent fracturing during subsequent forming operations.
The number of grooves and their respective depths are then calculated based on the original plate thickness, taking into account the predetermined residual thickness. This careful planning is essential for achieving precise bends while minimizing material stress.
To mitigate metal burr formation and preserve tooling longevity, it’s crucial to control the knife feed rate. Excessive feed can lead to poor surface finish, increased tool wear, and potential workpiece damage. As a best practice, the initial grooving depth should not exceed 0.8mm, and the process should involve a minimum of two cutting passes. Single-pass grooving is generally discouraged due to the increased risk of material deformation and poor quality outcomes.
For example, when processing a 1.2mm thick stainless steel sheet with a target remaining thickness of 0.5mm after grooving, a two-pass approach is recommended:
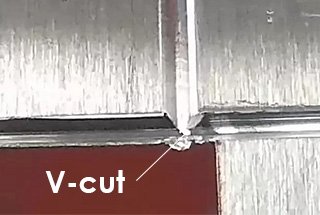
This progressive cutting strategy results in the desired 0.5mm remaining thickness while minimizing metal burr formation, as illustrated in Figure 3. This method ensures optimal material removal, reduces thermal stress, and enhances overall part quality.
By adhering to these guidelines and carefully considering the interplay between groove depth and remaining thickness, manufacturers can achieve superior bending results, extend tool life, and maintain high production efficiency.
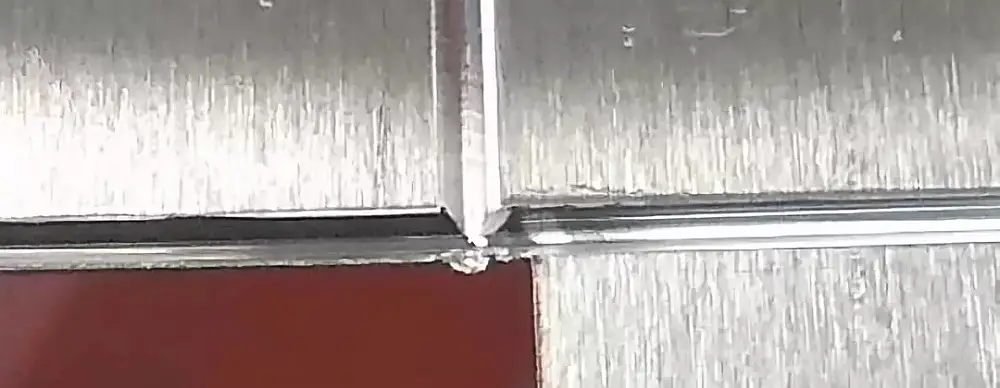
Fig.3 Grooving effect
The v-grooving process is intricately linked to the phenomenon of springback in sheet metal bending. During bending operations, sheet metal undergoes elastic-plastic deformation, resulting in a tendency to partially return to its original shape upon load removal. This springback effect leads to deviations in the final bending angle, which must be compensated for in the grooving process.
To achieve precise bending angles in the finished workpiece, the v-grooving angle is strategically set to counteract the anticipated springback. Generally, the v-grooving angle is designed to be 1-2° greater than the desired final bending angle. This overcompensation accounts for the material’s elastic recovery.
For example, when aiming for a 90° bend in the workpiece, the v-grooving angle is typically set to 92° (refer to Figure 4). This 2° difference allows for the springback that occurs during the subsequent bending operation, resulting in the desired 90° angle after elastic recovery.
The effectiveness of this compensation technique is illustrated in Figure 5, which demonstrates how the initial over-grooving successfully mitigates the angle error caused by springback during bending. This approach ensures that the final bent component achieves the specified angular precision.
It’s important to note that the exact compensation angle may vary depending on factors such as material properties, sheet thickness, and bending radius. In some cases, empirical testing or finite element analysis may be necessary to determine the optimal grooving angle for specific applications and materials.

Fig.4 Grooving angle and depth

Fig.5 Forming and control rebound effect
Grooving knives are essential tools in metal fabrication, particularly in HVAC ductwork and sheet metal processing. They are primarily categorized into four main types: rhombic top-angle, square, triangular, and circular grooving knives (Figure 6). Each type is designed for specific grooving applications and v-groove angles.
The selection of appropriate grooving knives is critical for achieving precise and efficient v-groove formation. The key factor in knife selection is the relationship between the knife angle and the desired v-groove angle. As a general rule, the knife angle should be less than the intended v-groove angle to ensure proper material removal and groove formation.
For standard v-groove applications:
For specialized applications, such as forming rounded grooves or channels, circular knives should be utilized. These knives provide the necessary curvature for smooth, rounded groove profiles.
When selecting grooving knives, additional factors to consider include material thickness, hardness, and the specific requirements of the fabrication process. Proper knife selection and maintenance are crucial for achieving high-quality grooves, reducing tool wear, and optimizing overall production efficiency in metal fabrication operations.
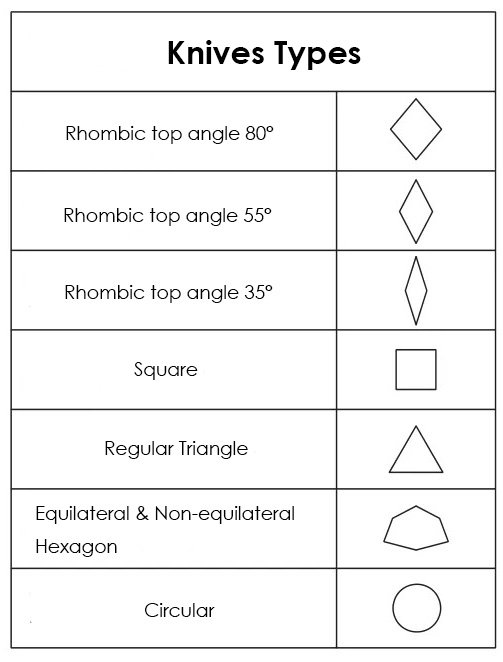
Fig.6 Knives types and shapes
When grooving long metal sheets with substantial depth, relying on a single knife can lead to detrimental effects due to excessive heat generation. This not only compromises grooving quality but also increases metal burr formation and other associated issues.
Consider a scenario where a 2m-long stainless steel plate requires grooving to a depth of 2mm. Setting an initial knife feed of 0.5mm and continuous grooving would result in significant heat accumulation, causing the knife to soften. Consequently, grooving quality deteriorates after approximately 1.5m, accompanied by increased burr size.
Conversely, reducing the knife feed to 0.2mm necessitates 10 grooving cycles to achieve the 2mm depth, severely impacting fabrication efficiency.
To optimize the grooving process for longer plates, it is crucial to consider both the knife feed amount and the number of simultaneously operating knives.
A typical configuration involves the simultaneous use of 3 to 4 knives (as illustrated in Figure 7).
Each knife is set with a progressively increasing feed amount. For instance, if the first knife feed is set at 5mm, the subsequent knives would be set at 7mm, 9mm, and 11mm, respectively.
This multi-knife approach ensures consistent grooving quality while significantly enhancing work efficiency. It allows for optimal heat distribution, reduces the thermal load on individual knives, and maintains the structural integrity of the metal sheet throughout the grooving process.
Furthermore, this method facilitates better chip evacuation and reduces the risk of built-up edge formation, contributing to improved surface finish and dimensional accuracy of the grooved profile.
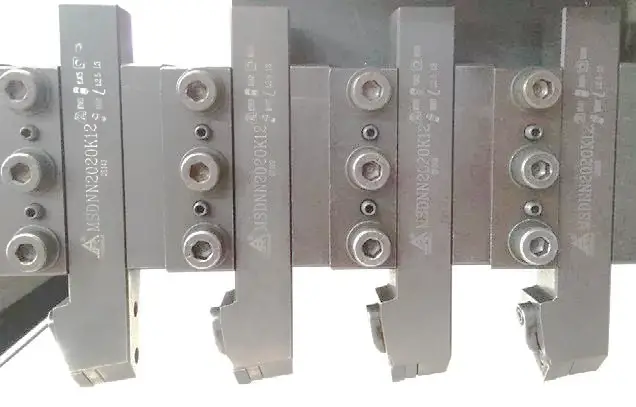
Fig.7 Knives amount and installation method
In the bending process, the quality of the final product is largely dependent on two critical parameters: the bending angle and size. Achieving precise control over these factors is essential for producing high-quality components.
To ensure accurate bending size and angle, consider the following key factors:
(1) Alignment of tooling: Misalignment between the top punch and bottom die can lead to significant errors in bending size. Prior to initiating the bending process, ensure proper centering of the upper and lower dies. Utilize precision alignment tools and regular calibration checks to maintain optimal tooling setup.
(2) Back gauge positioning: The relative position of the plate and the lower die may shift after back gauge adjustments, affecting the bending size. To mitigate this issue, re-measure and verify the back gauge position before each bending operation, especially when processing different part geometries or batch sizes.
(3) Workpiece-die parallelism: Insufficient parallelism between the workpiece and the lower die can cause inconsistent spring-back during bending, impacting the final angle. Implement a pre-bending inspection routine to measure and adjust parallelism, using precision levels or laser alignment systems for optimal results.
(4) Cumulative error prevention: Inaccuracies in the initial bend can propagate through subsequent operations, leading to compounded errors in the workpiece’s final dimensions and angles. Implement strict quality control measures for each bending step, including in-process measurements and adjustments as necessary.
(5) Die selection based on material thickness: The size of the V-opening in the lower die is inversely proportional to the bending force required. When processing metal plates of varying thicknesses, select the appropriate V-opening according to established guidelines. Generally, a V-opening width of 6-8 times the plate thickness offers optimal results, balancing force distribution and bend quality.
(6) V-groove alignment: When bending pre-grooved workpieces on a press brake, ensure precise alignment of three critical elements: the upper ambiguous edge, the V-shaped bottom edge of the workpiece, and the V-shaped bottom edge of the lower die. This alignment should occur along the same vertical plane to achieve consistent and accurate bends.
(7) Upper die angle adjustment: For bending operations following grooving, control the angle of the upper die to approximately 84°. This slight reduction from 90° helps prevent material clamping and ensures smooth bending without compromising the desired angle.
Additional considerations for optimal bending precision:
I presume most of you are already familiar with calculating the unfolding length before grooving.
But are you aware of how to calculate the unfolding length after grooving?
Allow me to demonstrate this with an example.
The picture below depicts the dimensions of each edge of the workpiece. The sheet metal has a thickness of 3mm.
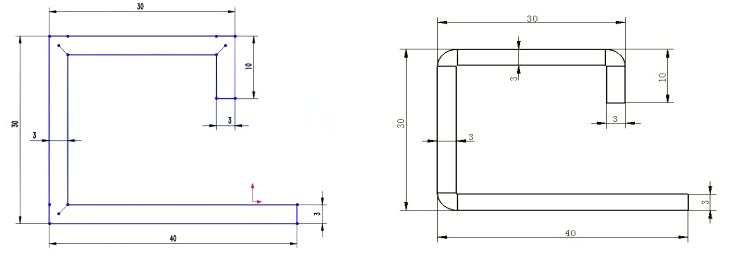
Bending after Grooving:
If the customer requests a smaller radius and the remaining sheet thickness is 0.5mm, the unfolding length L = (40-0.5) + (30-2×0.5) + (30-2×0.5) + (10-0.5) = 107mm.
Direct Bending without Grooving:
If the bending is done without grooving, and a K-factor of 0.25 is selected, the unfolding length L = (40-3+0.25) + (30-6+2×0.25) + (30-6+2×0.25) + (10-3+0.25) = 93.5mm.
Grooving is a new type of bending technique that has been selected by the market.
To produce high-quality products, it is essential to have mastery over various processing techniques.
Continuously exploring and adopting new techniques is crucial for producing even better products.
