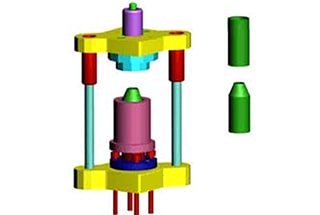
How can we revolutionize the production of I-type forgings? This article delves into innovative methods to enhance efficiency and precision in manufacturing I-type forgings, particularly for the oil drilling industry. By exploring the new split-die forging process, we aim to address common challenges like high material costs and low utilization rates. Read on to discover how these advancements can lead to substantial cost savings, improved market competitiveness, and high dimensional accuracy in forged parts.
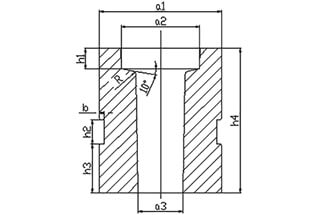
I-type forgings are common parts in the oil drilling industry, including wellhead devices, oil trees, throttling and pressure equipment, and there is a high market demand for them.
The shape of this type of forging has the following characteristics: the two ends of the flange and the intermediate cylinder are coaxial, and there is a diameter difference between the flange and intermediate connecting cylinder.
The current commonly used production process for I-shaped forgings involves two steps:
(1) The production process starts by directly forging large cylindrical forgings based on the rough dimensions of the flange diameter of the product. These large cylindrical forgings are then further processed through machining.
(2) In addition to the above process, a symbolic pulling and elongation process is used to form the small central cylindrical part.
However, both of these processes have the following shortcomings:
In this article, our focus is on the forging type of forgings. Our goal is to break through the limitations of the traditional production process and avoid the problems mentioned above in order to reduce production costs, adapt to market rhythms, and increase market competitiveness.
We mainly concentrate on the shape of such forgings, starting from the design of the split die and using the tire die forging process for production to achieve the dimensional accuracy of the forged parts.
As these forgings are mainly produced in small and medium batches, they are manufactured using the die forging process.
Due to excessive investments in workwear and high production costs, improving market competitiveness has become challenging. Therefore, a comprehensive analysis is being considered. Research on the production process of splitting die can offer dual benefits, such as precision in die forging products and the production of various small batches of tire die forging.
The specific process flow diagram is illustrated in Figure 1.
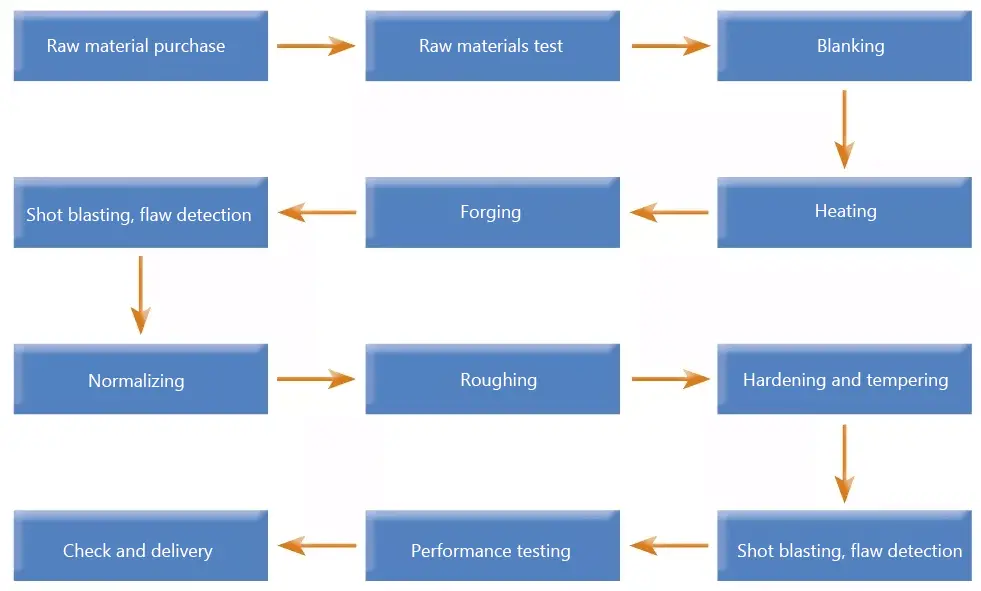
Figure 1: Process flow diagram
The newly developed I-shaped parts weigh 101.96 kg in mass and 154 kg in forged parts. The forging process calculation indicates a complexity factor S of 0.53.
As the free forging process already belongs to the complex class of forgings, the design of the split die requires higher standards.
Using the part diagram provided by the user, the forgings are created based on the new process plan. This plan brings the forgings process closer to balance resulting in high dimensional accuracy. Figure 2 displays the part and forging diagrams.

Figure 2 Diagram of parts and forgings
The production plan for the forging process is as follows: first, the billet is drawn, and then the flange is formed by upsetting one end of the tire die, followed by forming the other flange using the combination of the parting insert and the outer tube die.
This forging process ensures that the first upsetting process serves as the blanking process of the second upsetting process, thus enabling control over the eccentricities of the forgings and the dimensional accuracy of the blanks.
After careful calculations, it has been determined that the quality of the forged parts and the parting die quality combined weigh more than 600kg. Therefore, to ensure optimal results during the final parting die forging process, a 3t free forging hammer must be used as the forging equipment.
Design basis of tire mold, split insert and sleeve mold
Tire mold design basis: cold forging diagram → hot forging parts → tire mold. The dimensions of the hot forgings are calculated as in formula (1).

In the formula, Lt represents the forging size in the final forging temperature (mm); L denotes the size of the forged part in the cold state (mm); α stands for the material line expansion coefficient (1/C); t represents the final forging temperature (°C).
For forging materials in the oil industry, mainly AISI4130 and 410SS, the initial forging temperature is generally 1150℃, and the final forging temperature is equal to or greater than 860℃. As this forging process is relatively long and the final forging temperature is low, the cold shrinkage rate is appropriately reduced to 1.2% – 1.4%.
The design of the sub-packing is based on the tire mold design process, with an emphasis on the assembly of the sleeve mold during the design process. This approach helps avoid situations where the assembly is impossible or difficult.
Design of tire mold and split mold
Based on the established forging production process, the tire mold (as shown in Figure 3), split inserts (as shown in Figure 4), and sleeve mold (as shown in Figure 5) were designed by incorporating the elements of the tire mold design.

Figure 3 tire mold

Figure 4 split insert

Figure 5 sleeves mold
Figure 3 depicts the first upsetting die, which required an accurate calculation of the weight of the forged part during the initial design phase. Failure to do so can result in a filling of the back parting during free forging after upsetting.
The split inserts are illustrated in Figure 4. The design must take into account that the split insert is located in the middle cylinder of the forged part after the forging has been formed. To facilitate removal, a beveled groove is made at the split die interface. This groove allows for easy removal of the split insert after forging.
At the same time, local optimization design was carried out. The design of the end face contacting the inside of the flange was angled at 10°. The inside chamfering was R20mm, and the contacting chamfering between the outside and the second upset sleeve die was R15mm.
The overall slope of the outside of the mold is the same as the slope of the inner cavity of the upsetting mold shown in Figure 3. The diameter is reduced by 1 mm on one side to facilitate placement in the cavity of the sleeve model shown in Figure 5.
The sleeve die, shown in Figure 5, is designed to ensure the size of the flange after upsetting. The a2 and a3 sizes are designed for the hot forging part size, with a cavity slope free transition. Figure 6 shows a composite split die with split inserts and sleeve module.

Figure 6 split die
The tire mold is combined and forged using 3TZ, which results in a significant bearing force during the forging process. Consequently, in the design phase, the thickness of the sleeve mold is increased overall to account for this.
After verifying the actual small batch production, the split-die forging process plan proves to be successful and feasible. It also has the capability to guarantee the mass production process.
This article introduces a new process method for producing I-shaped forgings, which saves 23% of raw materials compared to direct free forging. The new scheme effectively produces I-shaped forgings that meet the desired process target value.
The forgings made through this method exhibit the same level of technology as die forging. Compared to die forging or direct free forging, this process saves 20% to 40% of raw materials, lowers production costs, and enhances process flexibility.
